When we think about a blueprint, we usually think about a technical drawing or guide for making something. It’s a design or pattern that can be followed. If we, for example, want to create a treehouse, then we would draw a blueprint and follow the design carefully to always have the same outcome as the blueprint instructs. Azure Blueprints works in much the same way. IT Engineers can use an Azure Blueprint to design and deploy Azure resources to Azure according to different rules and patterns that an enterprise has. By using these blueprints it becomes really easy to quickly deploy resources that adhere to the rules
and requirements of an enterprise.
Case Description
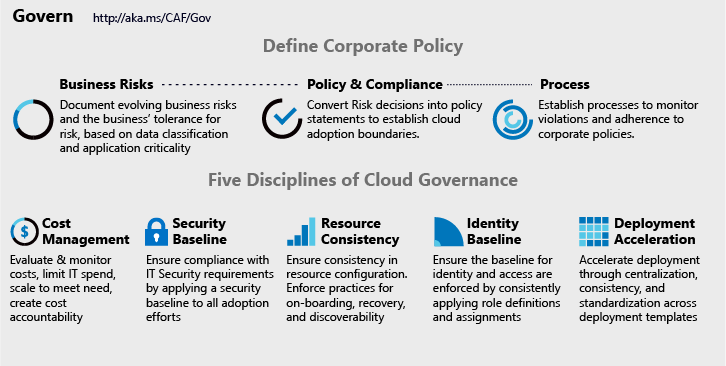
When we look at an enterprise, we usually see that they lack the tools to enforce the governance of Azure Resources. The way they enforce rules on resources is done by a group within the company that is responsible for teaching the development teams how to use Azure they way that the company wants it. This teaching can be done in many different ways, one of which could be a document describing how to create resources and what rules apply when creating them. The development teams can then start using these documents to create the resources they need.
One of the problems that might occur is that the development team makes a mistake while trying to set up the resources they need. When this happens they will go to the central group that is responsible for Azure and ask them how to fix this. This essentially creates a bottleneck within the company. You can manage when one or two teams ask questions or need assistance when creating resources. But when you have more than ten teams the central team will be delayed in their work.
Also what can happen is that the enterprise can enforce governance when things are already deployed to Azure. This could cause some problems as other resources might have to be reconfigured to adhere to the new rules.
This is where Azure Blueprints comes into play! By using Azure Blueprints not only can we define how the resources should be made and used so that we always end up with the same result as the Blueprint describes. We can also check upon these created resources and make sure that they comply to the set of rules made by the enterprise. This makes sure that the enterprise does not have to interfere everytime resources are requested as they have already made sure that the blueprints use their rules.
This removes the bottleneck described above as development teams can ask the group responsible for the governance of Azure Resources to create certain resources for them. All the group has to do is use the correct blueprint on the subscription of the development team and they will have the resources they request without having to do anything themselves.
What is Azure Blueprints?
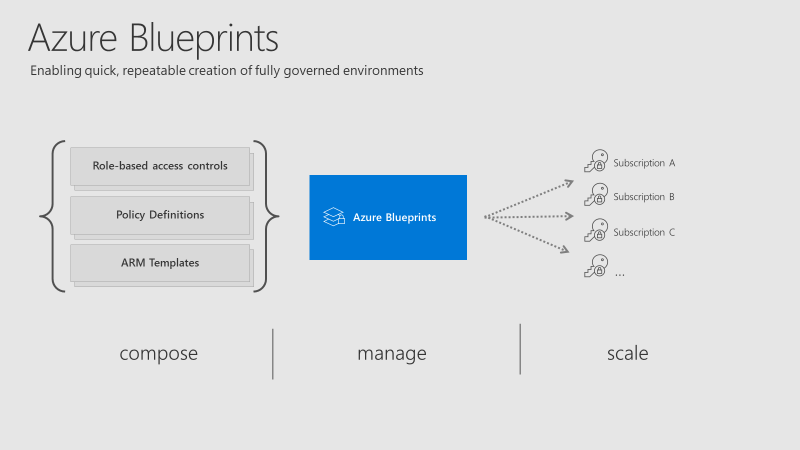
The goal of Azure Blueprints is to assist development teams or central Azure Architecture teams in deploying new environments easily and quickly but still adhere to the companies rules.
There are a few artifacts that are used within Azure Blueprints:
- Role Assignments
- Policy Assignments
- ResourceGroups
- ARM Templates
A blueprint is essentially a package that uses all these types of resources and artifacts together. this package then contains resources that comply with organizational standards and best practices.
Dive into Blueprints
Like most resources in Azure, a blueprint in Azure Blueprints has a natural lifecycle. A blueprint can be created and then deployed and when they are no longer needed they can be removed.
Azure blueprints also provides support for continuous integration and deployment.
An Azure Blueprint lifecycle typically consists of:
- Creating a blueprint
- Publishing a blueprint
- Creating and editing a new version of the blueprint
- Publishing a new version of a blueprint
- Deleting a specific version of a blueprint
- Deleting a blueprint
After filling in the meta data for the blueprint it is time to create the actual blueprint.
Creating Blueprint
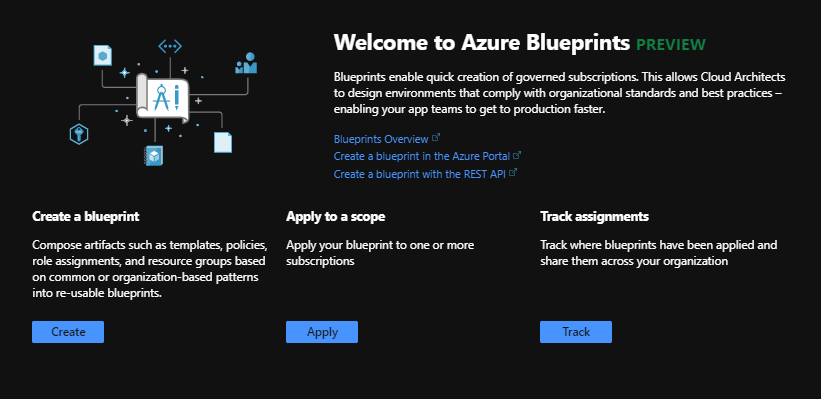
We will be creating a new blueprint in the Azure portal. There are currently options to do this with either Azure CLI or the SDK that is available for Azure Blueprints.
To find Azure Blueprints on Azure either look under the Policy service or go to all resouces and search for blueprint
After clicking on the blueprint service you should end up in the Azure Blueprint Blade. On this blade click on the Create button
Before we can add artifacts to a blueprint, we first need to give this blueprint a name and a location where we will save the blueprint.
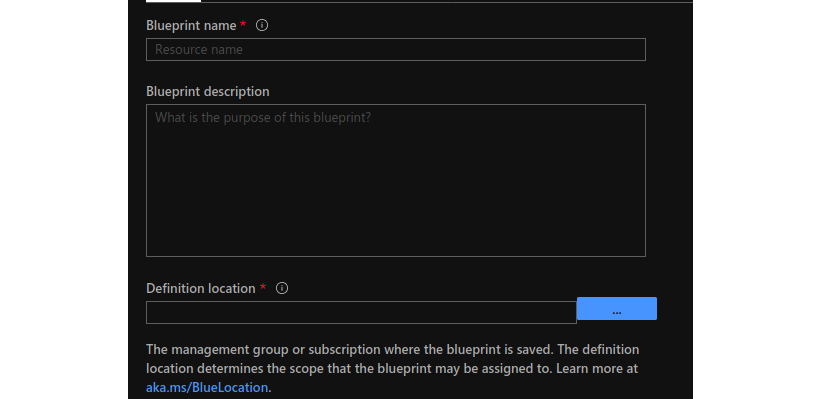
We have a few options when picking a location. We can pick between a Management Group or a single subscription.
More information on management groups can be found here: https://docs.microsoft.com/nl-nl/azure/governance/management-groups/overview
Filling the artifact with content
Once all the data is filled in correctly, click on Next: Artifacts
Now we can create the content of the blueprint itself. Here we can add things like Role assignements, ARM templates and Policies.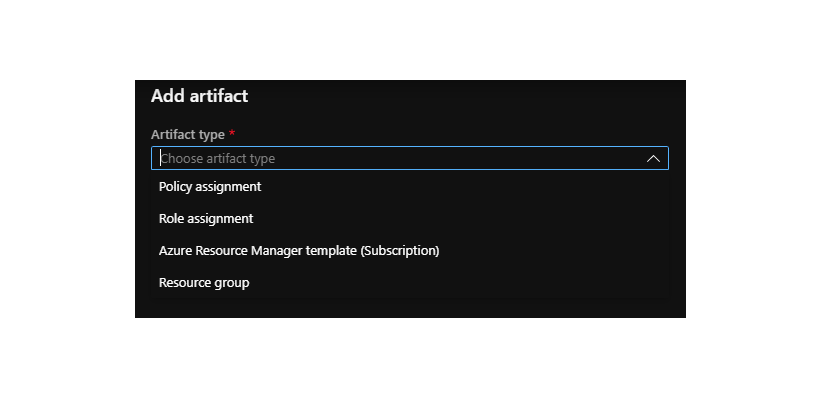
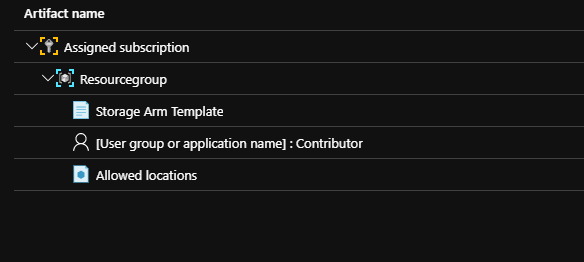
For this example I made a blueprint that will create a resource group with a storage account. The storage account is being created by an arm template and I made sure that the users that have
access to this resource group have the contributor role. The allowed Locations policy that is added restricts users from adding locations that are not allowed.
Now that we have given this Blueprint some content we can click on Save Draft to save the blueprint. The blueprint will now be saved but won’t be deployed just yet.
Publishing the blueprint
The blueprint that we just created will now be saved as a draft (we have now “drawn” the blueprint, but haven’t created anything with it yet). Let’s start publishing our blueprint and assigning it to a subscription.
Before we can assign a blueprint and start deploying it to a subscription we need to publish it. By clicking on the Publish Blueprint button the blueprint will be taken out of the draft status. This means that it is not possible to make any changes to this version of the blueprint anymore.
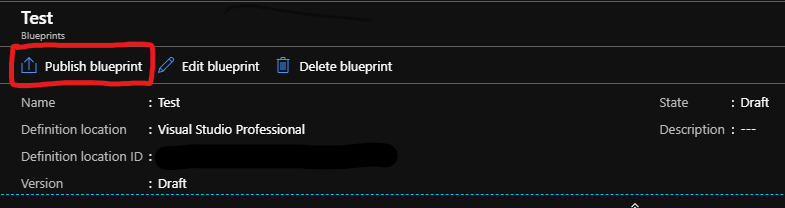
When publishing the blueprint it is required to give it a version number. When editing a published version we essential create another draft with a different version number. On assignment level we can then select the version number that we want to use.
After publishing the blueprint, The edit button turns into a Assign Blueprint button. Click on this to start assigning this blueprint.
On the assign Blueprint blade we can select a subscription that we want to deploy this blueprint to, some metadata about the blueprint itself. One important this we can do is select what version we want to deploy to the subscription. This gives us the flexability to deploy different versions to different subscriptions depending on the requirements.
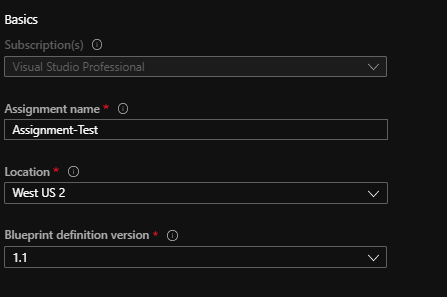
After filling in the basic data we leave the Lock setting to Don’t Lock
Then we want to fill in the parameter values for the artifacts. Some of the values need to be filled in, others are already filled in if this data was given when creating the artifact.
Lastly it is time to click on Assign to assign the blueprint and start the deployment process.
After the blueprint is assigned and the deployment process is completed we could now see that the storage account showed up in the resourcegroup that we created with this blueprint.
Blueprints as code
Ofcourse it is also possible to create an Azure Blueprint without using the portal. This gives you alot of freedom as you can create blueprints during a build or release pipeline or create your own code that can manage the these blueprints.
For this example I will be using PowerShell to create a blueprint and publish it.
Before we can start creating blueprints with PowerShell we first need to make sure that the Az.Blueprint module is installed.
Create a blueprint
Azure Blueprints makes it possible to create a repeatable set of Azure Resources that adhere to the rules and requirements of an organization. It can be used to keep track of what is deployed. What version is deployed where and makes it really easy to update a rule if required. Azure Blueprints also comes with an SDK and API, which gives you the chance to automate this process.
To create a blueprint we need to first start out by composing a blueprint. This can be done by creating a json file with different resources. We’ll start by creating a blueprint named ‘CloudRepublicBlueprint’ so that we can configure role and policy assignments for a subscription. Next we will add a resourcegroup and storage account to the blueprint. Finally we will publish the blueprint with a version number so that we can assign it to a subscription.
Start out by creating a blueprint.json file:
1 | { |
this blueprint.json file will be used to create the blueprint. Run the following script with the blueprint.json to create a draft of this blueprint:
1 | $blueprint = New-AzBlueprint -Name 'CloudRepublicBlueprint' -BlueprintFile .\blueprint.json |
This will create the blueprint in the subscription that is selected by default. To specify a subscription use SubscriptionId.
Assigning Resource Template
now that the storage account is created, we can add policies and Azure Resource Template to this resource group.
The following code will add a storage account where we can add the parameters when we assign the blueprint to a subscription:
1 | { |
Following code will use the parameters CloudRepublicStorageAccountType , CloudRepublicTagName and CloudRepublicTagValue that we need to provide in a parameter file
1 | { |
To assign the ARM template to the draft blueprint we run the following PowerShell script:
1 | New-AzBlueprintArtifact -Blueprint $blueprint -Type TemplateArtifact -Name 'CloudRepublicStorage' -TemplateFile .\storageTemplate.json -TemplateParameterFile .\storageTemplateParameters.json -ResourceGroupName storageRG |
Adding policies or role assignments
To add a policy or role assignment we need to create a json object for this as well. The example below uses the definition identifier for the Owner role which is the build in GUID 8e3af657-a8ff-443c-a75c-2fe8c4bcb635
1 | { |
PowerShell command to add the role assignment to the blueprint
New-AzBlueprintArtifact -Blueprint $blueprint -Name 'roleOwner' -ArtifactFile .\artifacts\roleOwner.jsonPublishing blueprint
now that all the artifacts and policies have been added to the blueprint it is time to finally publish the blueprint and make it available for assignment
Publish-AzBlueprint -Blueprint $blueprint -Version '1.0'this will publish the blueprint with version 1.0. The version can be set to anything. But for this example we set it to version 1.0
Assigning blueprint
The blueprint is published and ready to be assigned!
Blueprint assignment works the same as previous steps. So we first have to create an assignment.json file that contains our assignment details:
{
    "properties": {
        "blueprintId": "<id of blueprint>",
        "resourceGroups": {
            "storageRG": {
                "name": "<name of the storage account>",
                "location": "<location of the storage account>"
            }
        },
        "parameters": {
            "storageAccountType": {
                "value": "Standard_GRS"
            },
            "tagName": {
                "value": "CostCenter"
            },
            "tagValue": {
                "value": "ContosoIT"
            },
            "contributors": {
                "value": [
                    "<objectId of the principal from Azure Active Directory>"
                ]
            },
            "owners": {
                "value": [
                    "<objectId of the principal from Azure Active Directory>"
                ]
            }
        }
    },
    "identity": {
        "type": "systemAssigned"
    },
    "location": "westus"
}
PowerShell command the assign the blueprint
1 | New-AzBlueprintAssignment -Blueprint $blueprint -Name 'assignMyBlueprint' -AssignmentFile .\blueprintAssignment.json |
Conclusion
Azure Blueprints makes it possible to create a repeatable set of Azure Resources that adhere to the rules and requirements of an organization. It can be used to keep track of what is deployed. What version is deployed where and makes it really easy to update a rule if required. Azure Blueprints also comes with an SDK and API, which gives you the chance to automate this process.