Tests are stories we tell the next generation of programmers on a project. If you are to lazy to write them well consider moving to a different profession. This isn’t a job for you.
In a world where we use CI / CD pipelines to automate our releases unit tests are an essential part of a successful software project. Not only do they help us to debug the code we are writing faster but they also help us to validate the code before releasing it to our users.
In this post, we will go over the steps you can take to improve your unit tests and therefore create a better product in the end.
Naming
Using a good naming convention for a unit test does not necessarily help you to write a better product but it will help your team to identify clearly what unit is tested and what state the unit under test is in.
One of the most know conventions that are currently used is [MethodUnderTest]_[Scenario]_[ExpectedResult]. While it is not a bad naming convention it is limited. Writing the naming of the unit test this way leaves out some imported details and might not make it clear to other programmers what the test is trying to test. With naming it is better to tell the story of the test. Let’s look at two examples.
In this example, we are looking at a static method that checks on an order if the delivery is valid. Using the convention mentioned above we would get something like this:
IsDeliveryValid_InvalidDate_ReturnsFalse
While this is giving us a lot of information about what the unit under test is supposed to do it does not describe the scenario that we want to validate. Let’s look at a better example:
The above example describes the behavior of the application we are trying to test rather than the code that will be part of the test. This also will help new programmers to understand the application better with limited domain knowledge.
Test method layout
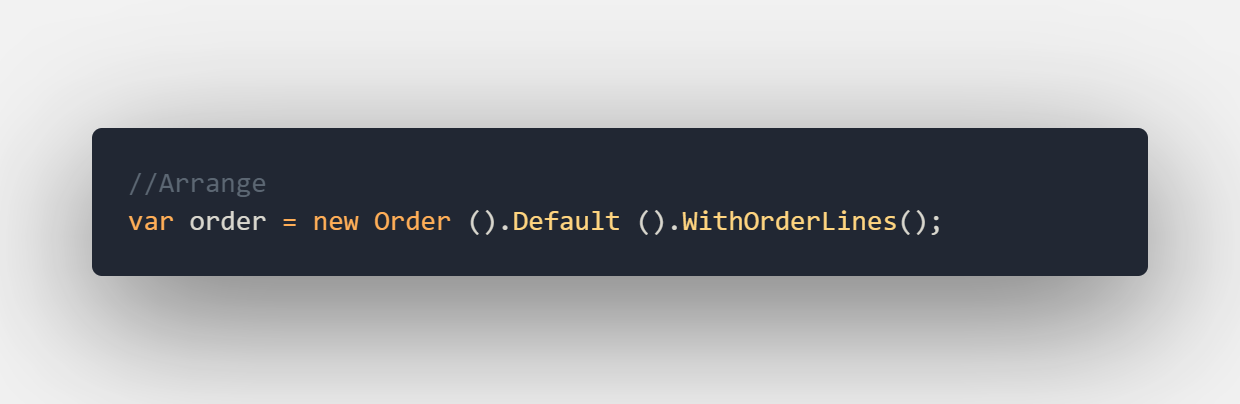
Another way to make your tests more readable and separate the parts of your tests is by using the Arrange, Act, and Assert pattern or AAA for short. using this pattern we split our test into 3 distinct parts.
The Arrange section is used to initialize objects and gather data needed for the test or set local variables.
The Act section is used to invoke the method that this test is designed for.
The Assert section is used to verify that we received the expected result from invoking the method under test.
Using this pattern a test could look like this:
Simplifying tests and reusing code
If you are writing tests you often have to instantiate objects that are under test and bring them into a specific state to perform the test. Instantiating all these objects in the test method can clutter up your test and lead to a lot of duplicate code.
The builder pattern is here to help. With this pattern, we can bring the objects into a state step by step to meet the requirements of our test. To use the builder pattern we create extension methods that allow us to buildup the object to the desired state. This helps to keep our tests clear, more readable and results in less duplicated code during testing.
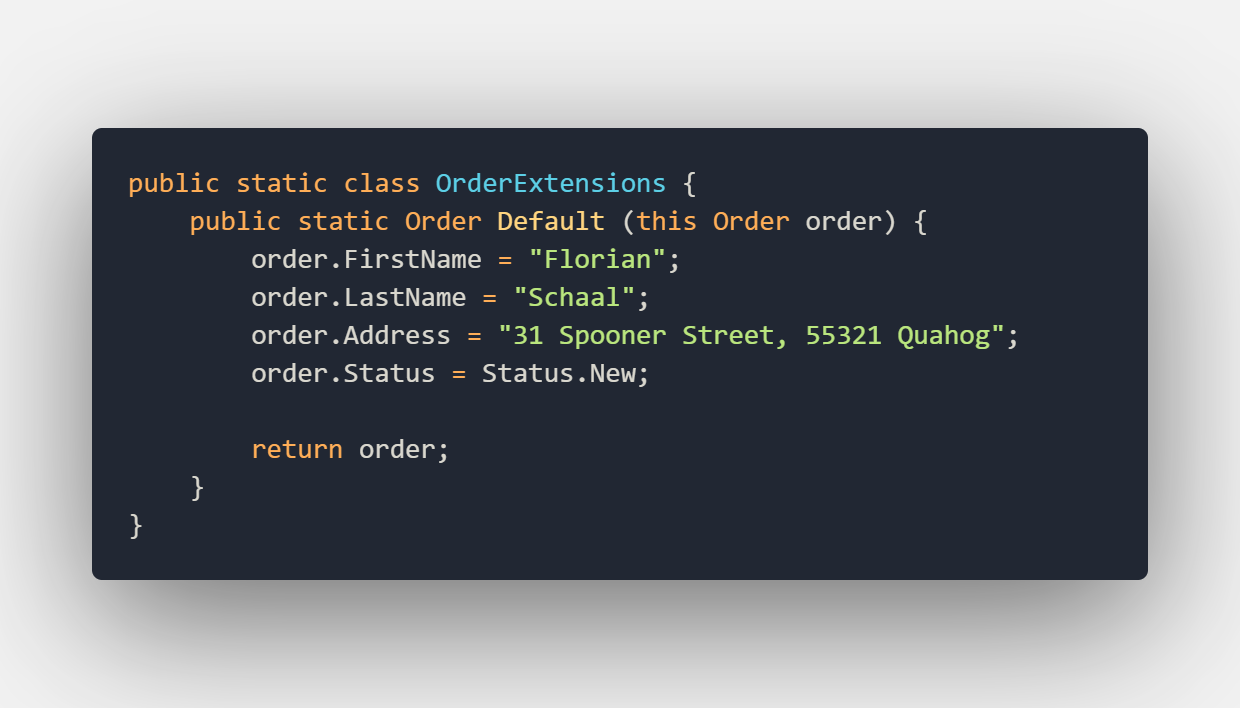
In this example, we will be testing the method that checks if an order is ready to be shipped. Since the order is an object that is heavily used in the system we would not want to create it over and over again. Let’s have a look at the order object:
As you can see we have a method called CanShip. We should test this method to ensure that for example, we do not ship orders to customers that are not paid yet. We might also want to test if CanShip still returns false if the Address is not set yet. We already have two tests to write where we need a new instance of the Order class in a specific state. Creating a new instance of the Order class every time from scratch would not be efficient.
So let’s start making use of the builder pattern to buildup the Order class. First, we need a base state that we call Default and we create an extension method for it:
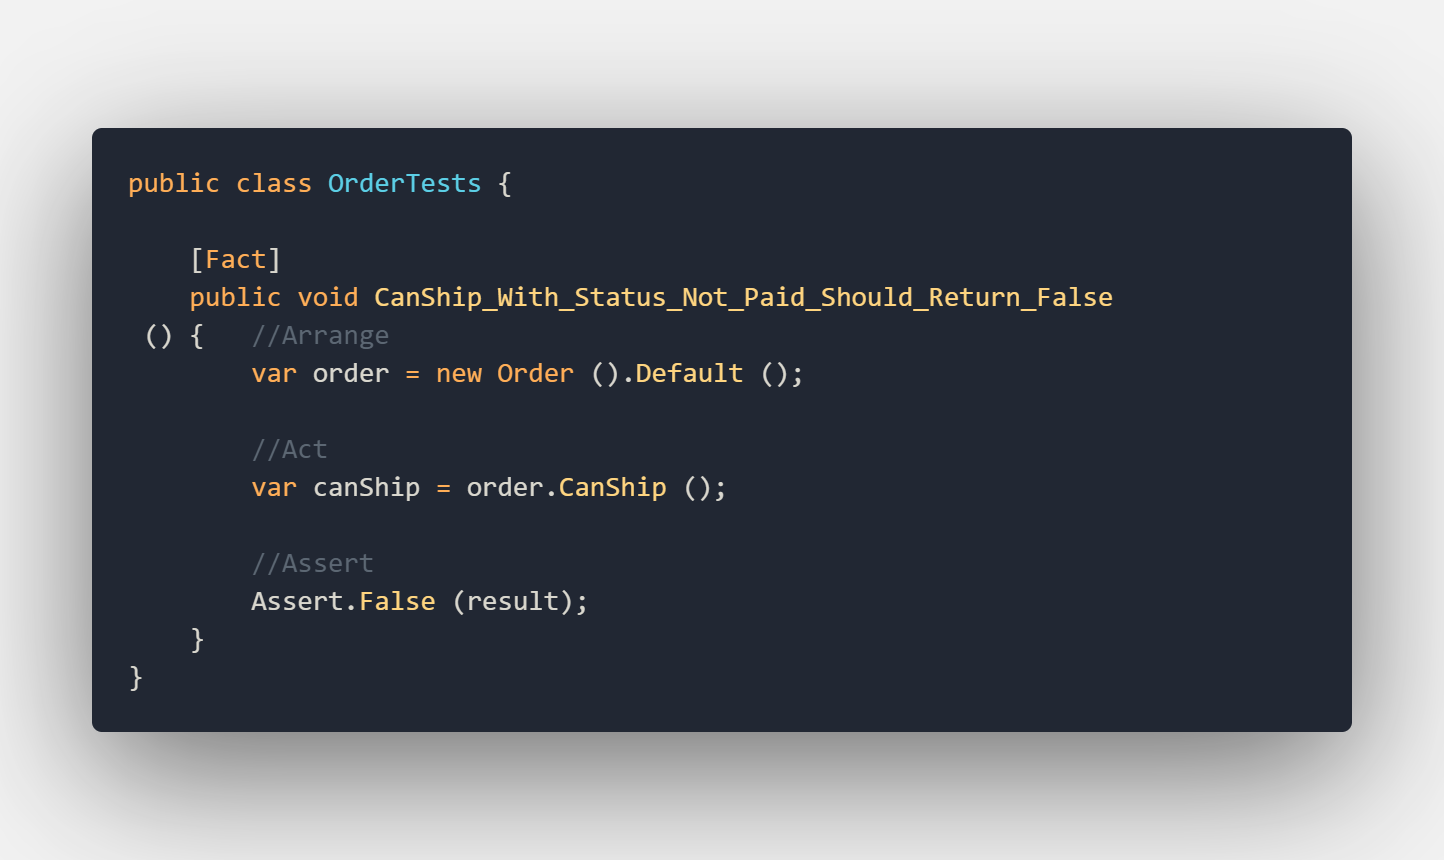
With this extension in place, we can start and write our first unit test for the Order class. The unit test will look as follows:
As you can see from the picture above we used the extension method to get the order in the default state. What this default state means for you or your team can depend on the object in the test or on how the object is used in the system. In our example default just sets all the fields to a valid value and sets the status to new.
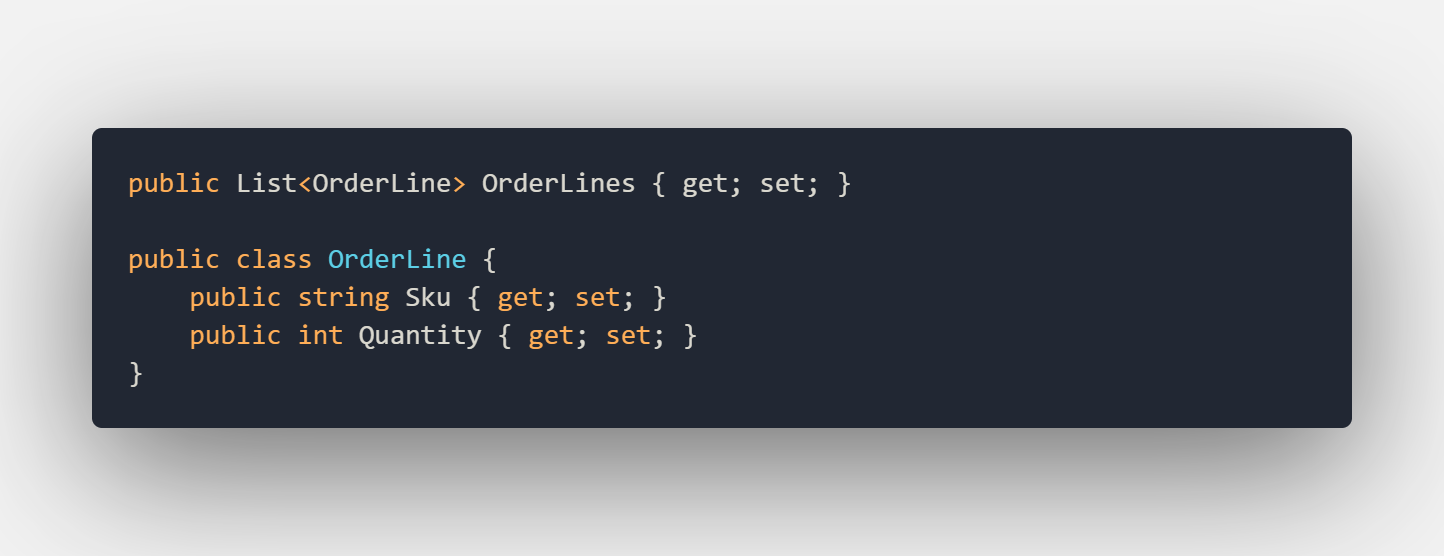
From hereon, we can keep using this method in other tests as well. Now let’s imagine we add order-lines to our order class like this:
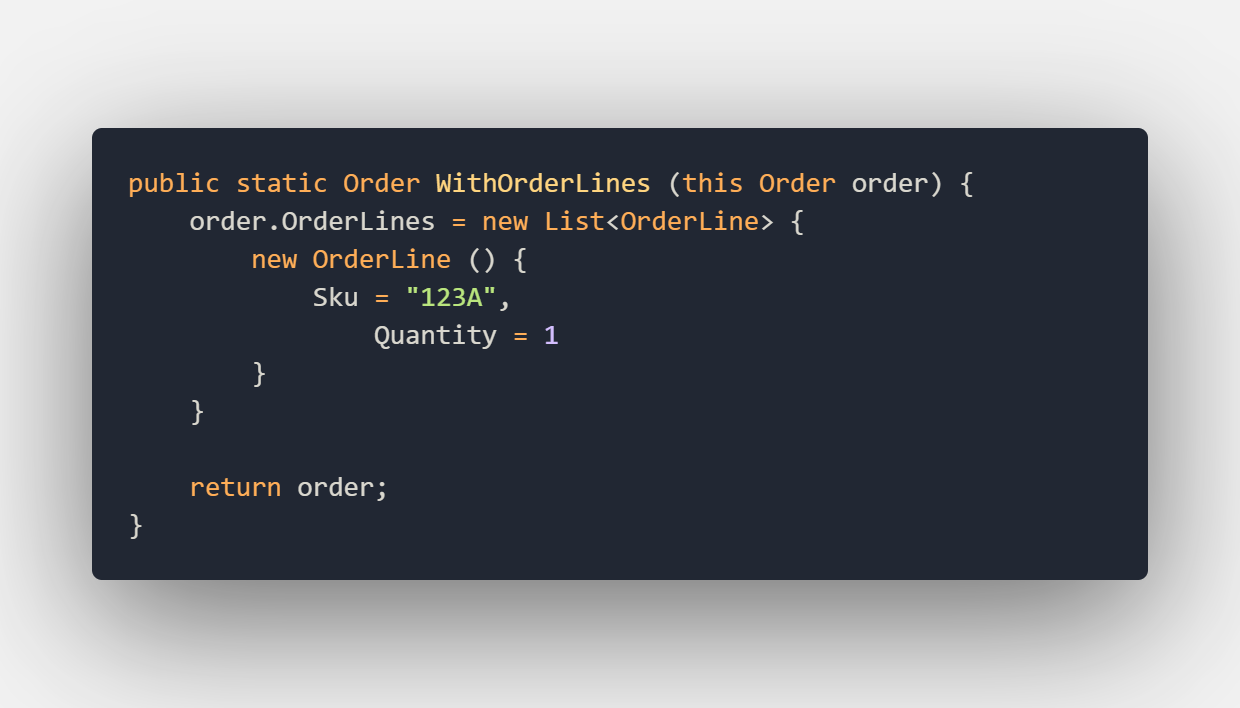
We can now create a new extension method for our order that allows us to build a default order with order-lines. The extension method would look like this:
In the method above I’ve created the order-line from scratch but let’s say we want to test this object in multiple tests we could create the same Default extension method as we did for the order class. We can now use this extension method in our next test like this:
As you can see we can make the test a lot smaller and with less repetitive code. It is like ordering a pizza and saying which toppings you want on the pizza.
Mocking
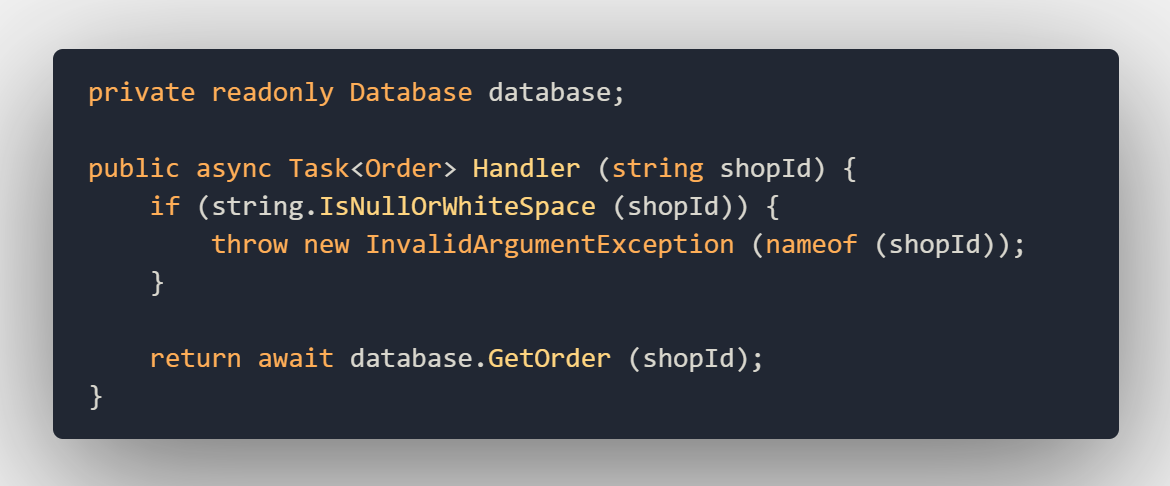
With mocking we emulate behavior during our tests that are outside of the scope that we need to test but is needed for the test to run. A good example would be a method the does some validation logic and then gets an order from the database. We would want to test the validation logic but not the database call because this would be more like a regression test.
In the .Net world, there are a lot of Nuget packages that can help you with mocking but one of the more popular ones is Moq. This is also the package we are gonna use. While writing the mocking of for example the database call we can use some of the things we learned earlier. In the example below, we are gonna use the builder pattern again to get rid of the mocking code and move it to an extension method.
Lets take the example we described above. The method could look like this:
We are checking that the orderId is not null or empty and then we are calling the GetOrder method to get the Order from the database.
If we want to mock this method we need to set up a mock instance of the database class. The setup for this mock will look like this:
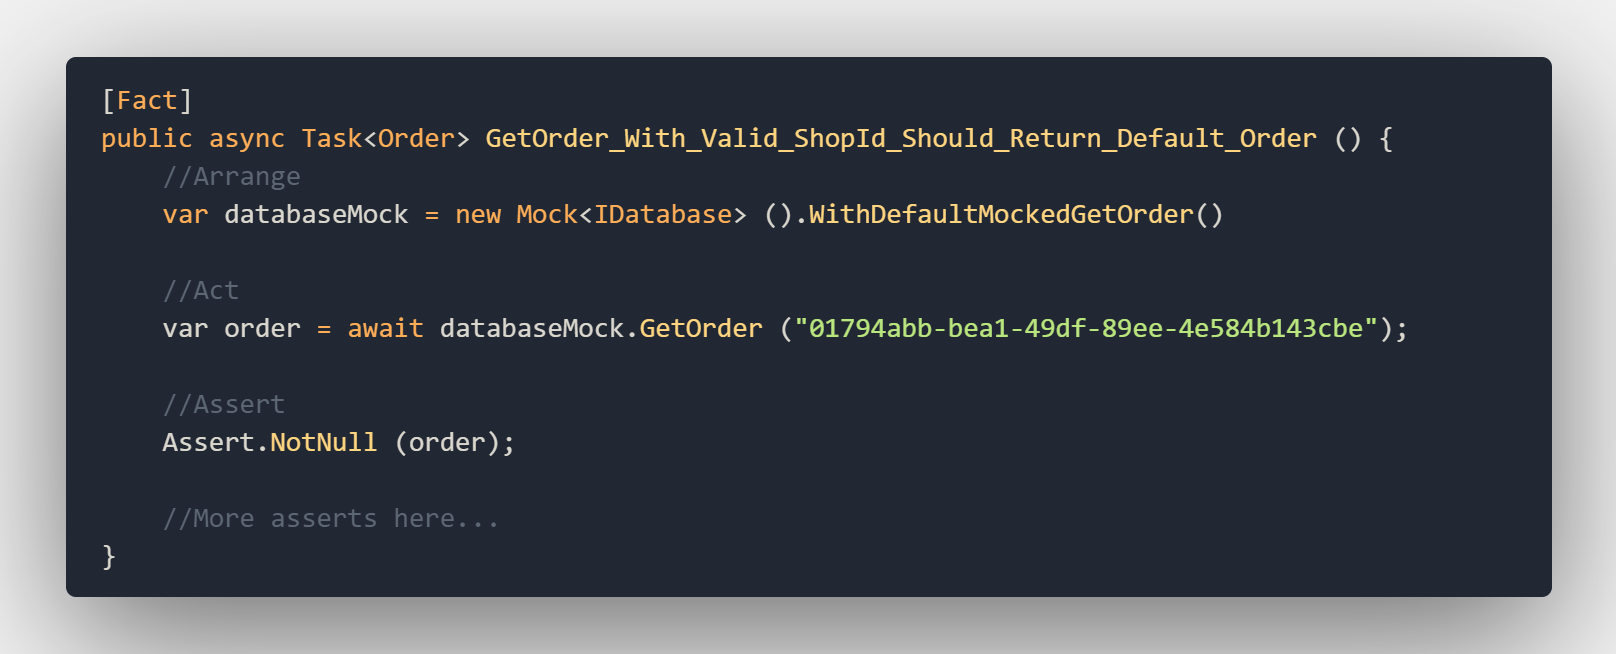
As you can see we are using the Default extension here on the Order class to create a new default Order. Now we could set up the database every time like this in every test we use but that would be tedious to write the same code every time so let’s create another extension method:
With this extension method, we can quickly set up a new database and return a default order whenever we need to during testing. So let’s see what a test would look like using this extension method:
In the beginning, it seems like a lot of extra work to create all these extension methods but ones you have a lot of tests that reuse the extension methods they feel like a big time saver.
Conclusion
As we saw in the scenarios described above we can make some nice improvements to our unit tests to slim them down and make the code more reusable. I would not recommend to rewrite all you tests straight away but ones you need to fix a test or write new ones you can use these tips to make them better.
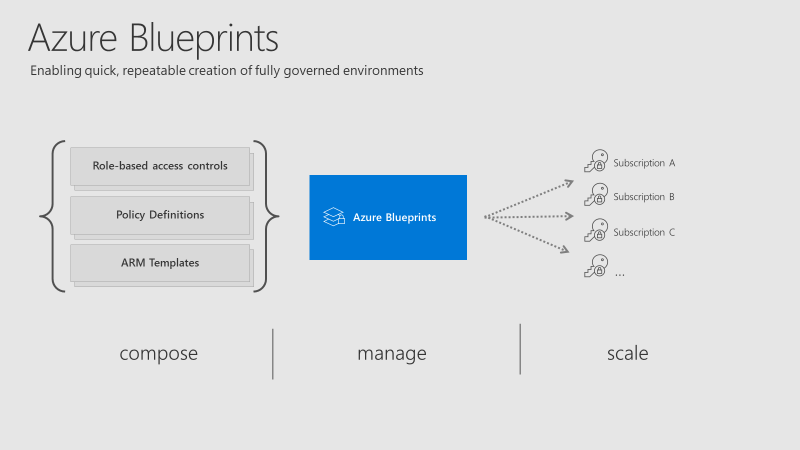
When we think about a blueprint, we usually think about a technical drawing or guide for making something. It’s a design or pattern that can be followed. If we, for example, want to create a treehouse, then we would draw a blueprint and follow the design carefully to always have the same outcome as the blueprint instructs. Azure Blueprints works in much the same way. IT Engineers can use an Azure Blueprint to design and deploy Azure resources to Azure according to different rules and patterns that an enterprise has. By using these blueprints it becomes really easy to quickly deploy resources that adhere to the rules and requirements of an enterprise.
Case Description
When we look at an enterprise, we usually see that they lack the tools to enforce the governance of Azure Resources. The way they enforce rules on resources is done by a group within the company that is responsible for teaching the development teams how to use Azure they way that the company wants it. This teaching can be done in many different ways, one of which could be a document describing how to create resources and what rules apply when creating them. The development teams can then start using these documents to create the resources they need.
One of the problems that might occur is that the development team makes a mistake while trying to set up the resources they need. When this happens they will go to the central group that is responsible for Azure and ask them how to fix this. This essentially creates a bottleneck within the company. You can manage when one or two teams ask questions or need assistance when creating resources. But when you have more than ten teams the central team will be delayed in their work.
Also what can happen is that the enterprise can enforce governance when things are already deployed to Azure. This could cause some problems as other resources might have to be reconfigured to adhere to the new rules.
This is where Azure Blueprints comes into play! By using Azure Blueprints not only can we define how the resources should be made and used so that we always end up with the same result as the Blueprint describes. We can also check upon these created resources and make sure that they comply to the set of rules made by the enterprise. This makes sure that the enterprise does not have to interfere everytime resources are requested as they have already made sure that the blueprints use their rules.
This removes the bottleneck described above as development teams can ask the group responsible for the governance of Azure Resources to create certain resources for them. All the group has to do is use the correct blueprint on the subscription of the development team and they will have the resources they request without having to do anything themselves.
What is Azure Blueprints?
The goal of Azure Blueprints is to assist development teams or central Azure Architecture teams in deploying new environments easily and quickly but still adhere to the companies rules.
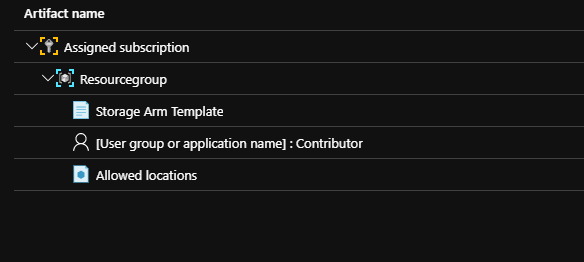
There are a few artifacts that are used within Azure Blueprints:
Role Assignments
Policy Assignments
ResourceGroups
ARM Templates
A blueprint is essentially a package that uses all these types of resources and artifacts together. this package then contains resources that comply with organizational standards and best practices.
Dive into Blueprints
Like most resources in Azure, a blueprint in Azure Blueprints has a natural lifecycle. A blueprint can be created and then deployed and when they are no longer needed they can be removed.
Azure blueprints also provides support for continuous integration and deployment.
An Azure Blueprint lifecycle typically consists of:
Creating a blueprint
Publishing a blueprint
Creating and editing a new version of the blueprint
Publishing a new version of a blueprint
Deleting a specific version of a blueprint
Deleting a blueprint
After filling in the meta data for the blueprint it is time to create the actual blueprint.
Creating Blueprint
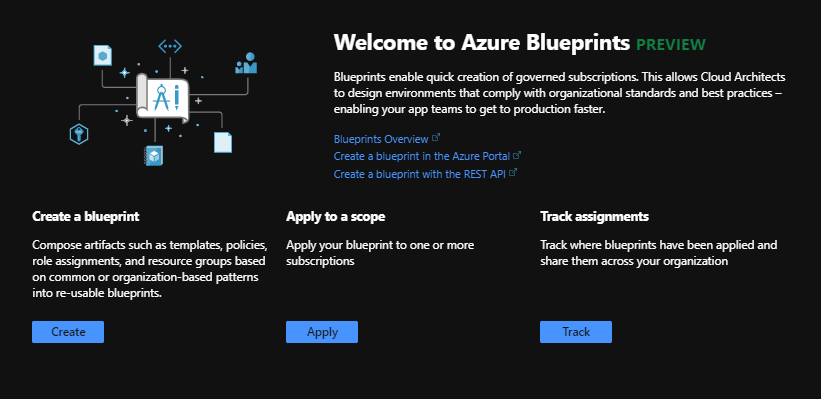
We will be creating a new blueprint in the Azure portal. There are currently options to do this with either Azure CLI or the SDK that is available for Azure Blueprints.
To find Azure Blueprints on Azure either look under the Policy service or go to all resouces and search for blueprint
After clicking on the blueprint service you should end up in the Azure Blueprint Blade. On this blade click on the Create button
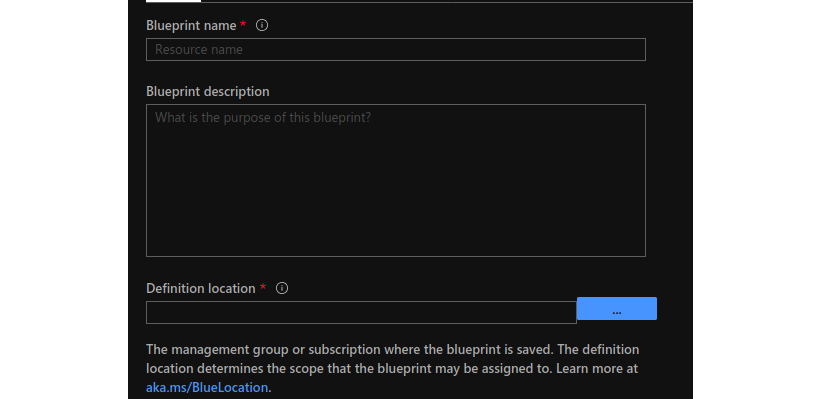
Before we can add artifacts to a blueprint, we first need to give this blueprint a name and a location where we will save the blueprint.
Once all the data is filled in correctly, click on Next: Artifacts
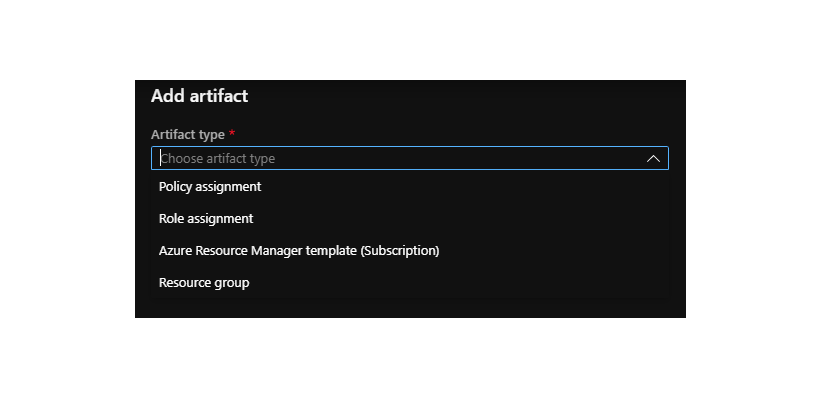
Now we can create the content of the blueprint itself. Here we can add things like Role assignements, ARM templates and Policies.
For this example I made a blueprint that will create a resource group with a storage account. The storage account is being created by an arm template and I made sure that the users that have access to this resource group have the contributor role. The allowed Locations policy that is added restricts users from adding locations that are not allowed.
Now that we have given this Blueprint some content we can click on Save Draft to save the blueprint. The blueprint will now be saved but won’t be deployed just yet.
Publishing the blueprint
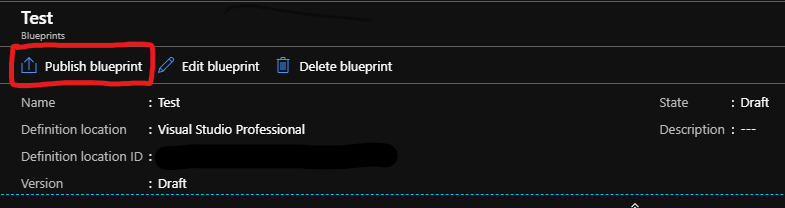
The blueprint that we just created will now be saved as a draft (we have now “drawn” the blueprint, but haven’t created anything with it yet). Let’s start publishing our blueprint and assigning it to a subscription.
Before we can assign a blueprint and start deploying it to a subscription we need to publish it. By clicking on the Publish Blueprint button the blueprint will be taken out of the draft status. This means that it is not possible to make any changes to this version of the blueprint anymore.
When publishing the blueprint it is required to give it a version number. When editing a published version we essential create another draft with a different version number. On assignment level we can then select the version number that we want to use. After publishing the blueprint, The edit button turns into a Assign Blueprint button. Click on this to start assigning this blueprint.
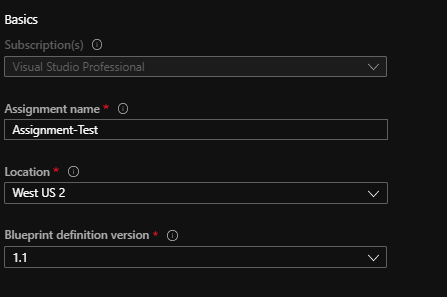
On the assign Blueprint blade we can select a subscription that we want to deploy this blueprint to, some metadata about the blueprint itself. One important this we can do is select what version we want to deploy to the subscription. This gives us the flexability to deploy different versions to different subscriptions depending on the requirements.
After filling in the basic data we leave the Lock setting to Don’t Lock Then we want to fill in the parameter values for the artifacts. Some of the values need to be filled in, others are already filled in if this data was given when creating the artifact. Lastly it is time to click on Assign to assign the blueprint and start the deployment process.
After the blueprint is assigned and the deployment process is completed we could now see that the storage account showed up in the resourcegroup that we created with this blueprint.
Blueprints as code
Ofcourse it is also possible to create an Azure Blueprint without using the portal. This gives you alot of freedom as you can create blueprints during a build or release pipeline or create your own code that can manage the these blueprints.
For this example I will be using PowerShell to create a blueprint and publish it.
Before we can start creating blueprints with PowerShell we first need to make sure that the Az.Blueprint module is installed.
Create a blueprint
Azure Blueprints makes it possible to create a repeatable set of Azure Resources that adhere to the rules and requirements of an organization. It can be used to keep track of what is deployed. What version is deployed where and makes it really easy to update a rule if required. Azure Blueprints also comes with an SDK and API, which gives you the chance to automate this process.
To create a blueprint we need to first start out by composing a blueprint. This can be done by creating a json file with different resources. We’ll start by creating a blueprint named ‘CloudRepublicBlueprint’ so that we can configure role and policy assignments for a subscription. Next we will add a resourcegroup and storage account to the blueprint. Finally we will publish the blueprint with a version number so that we can assign it to a subscription.
    {
    "properties": {
        "description": "This blueprint sets tag policy and role assignment on the subscription, creates a ResourceGroup, and deploys a resource template and role assignment to that ResourceGroup.",
        "targetScope": "subscription",
        "parameters": {
            "storageAccountType": {
                "type": "string",
                "defaultValue": "Standard_LRS",
                "allowedValues": [
                    "Standard_LRS",
                    "Standard_GRS",
                    "Standard_ZRS",
                    "Premium_LRS"
                ],
                "metadata": {
                    "displayName": "storage account type.",
                    "description": null
                }
            },
            "tagName": {
                "type": "string",
                "metadata": {
                    "displayName": "The name of the tag to provide the policy assignment.",
                    "description": null
                }
            },
            "tagValue": {
                "type": "string",
                "metadata": {
                    "displayName": "The value of the tag to provide the policy assignment.",
                    "description": null
                }
            },
            "contributors": {
                "type": "array",
                "metadata": {
                    "description": "List of AAD object IDs that is assigned Contributor role at the subscription",
                    "strongType": "PrincipalId"
                }
            },
            "owners": {
                "type": "array",
                "metadata": {
                    "description": "List of AAD object IDs that is assigned Owner role at the resource group",
                    "strongType": "PrincipalId"
                }
            }
        },
        "resourceGroups": {
            "storageRG": {
                "description": "Contains the resource template deployment and a role assignment."
            }
        }
    }
}
this blueprint.json file will be used to create the blueprint. Run the following script with the blueprint.json to create a draft of this blueprint:
Following code will use the parameters CloudRepublicStorageAccountType , CloudRepublicTagName and CloudRepublicTagValue that we need to provide in a parameter file
To add a policy or role assignment we need to create a json object for this as well. The example below uses the definition identifier for the Owner role which is the build in GUID 8e3af657-a8ff-443c-a75c-2fe8c4bcb635
now that all the artifacts and policies have been added to the blueprint it is time to finally publish the blueprint and make it available for assignment
Azure Blueprints makes it possible to create a repeatable set of Azure Resources that adhere to the rules and requirements of an organization. It can be used to keep track of what is deployed. What version is deployed where and makes it really easy to update a rule if required. Azure Blueprints also comes with an SDK and API, which gives you the chance to automate this process.
In deze blog ga ik uitleggen wanneer je Kubernetes kan gebruiken, hoe je ermee kunt starten op AKS en hoe je een applicatie kunt uitrollen. Als voorbeeld gaan we een wordpress applicatie uitrollen op Kubernetes.
Waarom heb ik Kubernetes nodig
Ik hoor vaak het argument waarom zou ik Kubernetes gebruiken wij hebben alles via Paas en Faas. Wij vanuit Cloud Republic kiezen ook meestal voor een serverless architectuur. Serverless is lekker schaalbaar, gemakkelijk om mee te starten en goedkoop. Nu is Kubernetes ook geen vervanging voor Paas of Faas maar het is een toevoeging aan je toolbox.
“Als je alleen een hamer hebt, neig je ernaar elk probleem te zien als een spijker.”
Je kan een hele hoop oplossingen kwijt in Paas en Faas maar niet voor alles is Paas of Faas de juiste oplossing bijv.
Als je complexe architecturen hebt kan dit een uitdaging zijn. Als je bijv. software moet installeren op de host om je applicatie werkend te maken of odbc drivers, speciale versies van frameworks nodig hebt of applicaties zoals een Jenkins server of een Zalenium test platform moet hosten.
Als je volledige controle wilt hebben over je infrastructuur. Je wilt bijv. controlle over de manier van schalen of het maximum aantal instanties. of je wilt mischien een blue-green deployment doen. Blue-green deployment
Als je legacy applicaties wilt hosten.
Als je geen vendor lock wilt hebben. Je kan je containers gemakkelijk verplaatsen naar een andere cloudprovider of naar je eigen datacenter
Kubernetes is ook mogelijk in je eigen datacentrum. Mag je data niet in de cloud staan dan is dit zeker een goed altenatief.
De applicaties zijn schaalbaar tot … instanties. Op een paas omgeving kun je standaard niet verder schalen dan 20 instanties in serverless is standaard het maximum instanties gelimiteerd tot 200.
Je hebt een standaard deploy methode voor elke applicatie. Het maakt niet uit of je een Nodejs, een .Net Core of een Java applicatie of een standaard CMS systeem. De deploy methode is altijd het uitrollen van een container welke alle dependencies bevat.
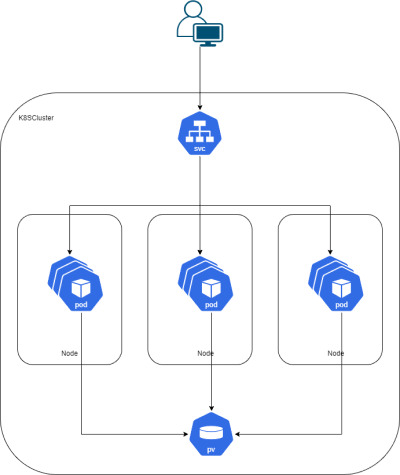
Wat is Kubernetes
Kubernetes, ook wel k8s genoemd, is kort gezegd een open-source systeem beheren van grote groepen containers en containerized applicaties. Met de software zijn containers te groeperen en eenvoudig(er) te beheren. Kubernetes kan je onder andere helpen met de volgende zaken:
Service discovery en loadbalancing
Kubernetes kan de load van applicaties verdelen over de verschillende instanties van de applicatie zodat de load verdeelt wordt over de verschillende instanties. Als je applicatie gaat schalen zullen de nieuwe instanties worden toegevoegd aan de interne dns server en het binnenkomend verkeer wordt verdeelt over de nieuwe instanties.
Elke pod waar die een poort heeft gepubliseerd zal bereikbaar zijn doormiddel van een service bijv. een database server. Deze services worden toegevoegd aan een service registry. Als dan een pod een verbinding wil maken met de database pod dan gaat dit via de service. Aan het service registry zal gevraagd worden naar welk endpoint er verbonden dient te worden. Mocht er een service bij komen of mochten er meer pods beschikbaar zijn door een schaling worden deze toegevoegd en mocht er een niet meer werken dan wordt de service registry bijgewerkt.
Storage orchestration
In Kubernetes heb je de mogelijkheid om een gedeelde storage in te stellen op je cluster. Stel je voor dat je een MySql server draait dan wil je niet dat als je MySql container stuk gaat dat je database weg is omdat deze werd opgeslagen in je container. Data welke belangerijk is en die je niet kwijt wil moet je niet in je container opslaan. Je kan hiervoor een persistant volume aanmaken en dit kun je koppelen aan een folder in je container. Zodoende als je container gaat schalen of hij werkt niet meer staan je database bestanden op een plaats buiten je container en kunnen de eventuele nieuwe containers ook bij de bestanden. Tevens is het gemakkelijker om je bestanden te backuppen op een gedeelde storage dan dat het een backup moet maken in verschillende containers.
Er zijn veel providers welke ondersteuning bieden aan Kubernetes:
Geautomatiseerd applicaties updaten en terug rollen
In Kubernetes kun je geautomatiseerd je applicaties updaten zonder downtime. Je kan opgeven hoeveel pods er offline mogen zijn tijdens een update van de applicatie. Je kunt ook opgeven dat er extra pods moeten worden aangemaakt tijdens de update zodoende blijft je applicatie op de gewenste hoeveelheid instanties. Mocht de nieuwe versie toch niet goed zijn is deze gemakkelijk terug te rollen. Kubernetes houd een history bij van de gedeployde versies.
Automatische verdeling van resources
Kubernetes verdeeld automatisch de containers over de nodes gebaseerd op de recourse requirements en de beschikbaarheid op de nodes. Nodes kunnen worden voorzien van labels zodat alleen bepaalde workloads daar mogen draaien. Dit is iets anders als loadbalancing, bij loadbalancing wordt de load verdeelt over meerder pods maar deze zouden best op dezelfde node kunnen staan hierdoor zou een node het een stuk drukker krijgen als een andere node in je cluster.
Automatisch herstellend
Mocht er een workload niet meer goed functioneren dan kan Kubernetes zelf een nieuwe versie van de pod opstarten. Of de pod nog goed functioneert kan op meerdere manieren gecontroleerd worden.
In een Dockerfile is een ENTRYPOINT gedefinieerd zodra dit process niet meer beschikbaar is zal de pod gestopt worden.
1 2 3 4 5
FROM mcr.microsoft.com/dotnet/core/runtime:3.1 COPY --from=build-env /app/out .
In een pod definitie kun je een livenessProbe instellen met bijv. een url welke gecontroleerd word als de response van de URL anders is dan een status code 200 zal de pod als unhealthy worden gezien.
In Kubernetes kun je secrets en configuraties aanmaken welke dan gebruikt kunnen worden in de applicaties. Deze objecten zijn op alle nodes beschikbaar en worden beheerd door Kubernetes. Secrets en configuraties kunnen worden uitgelezen als environment variabelen of als een volume worden gemount in de pod.
Hoe begin je met Kubernetes
Het is aan te raden om een managed instantie van Kubernetes af te nemen bij een public cloud provider. Bij een managed Kubernetes instantie hoef je je niet meer druk te maken over de installatie en configuratie van het cluster. Het kost namelijk een hele hoop tijd om een goed werkend en een veilig cluster te bouwen. Je moet het cluster blijven monitoren of het nog goed werkt en zelf alerts instellen om op de hoogte gehouden te worden als het cluster niet goed functioneert. Omdat Kubernetes zo uitgebreidt is kan er ook ontzettend veel misgaan en dan moet je het zelf troubleshooten en oplossen.
Er zijn heel veel varianten van Kubernetes te krijgen enkele voorbeelden zijn:
Azure Kubernetes Service (AKS)
Amazon Elastic Kubernetes Service (EKS)
Google Kubernetes Engine (GKE)
Ik ga het hier verder over AKS hebben dit is de managed Kubernetes oplossing van Azure.
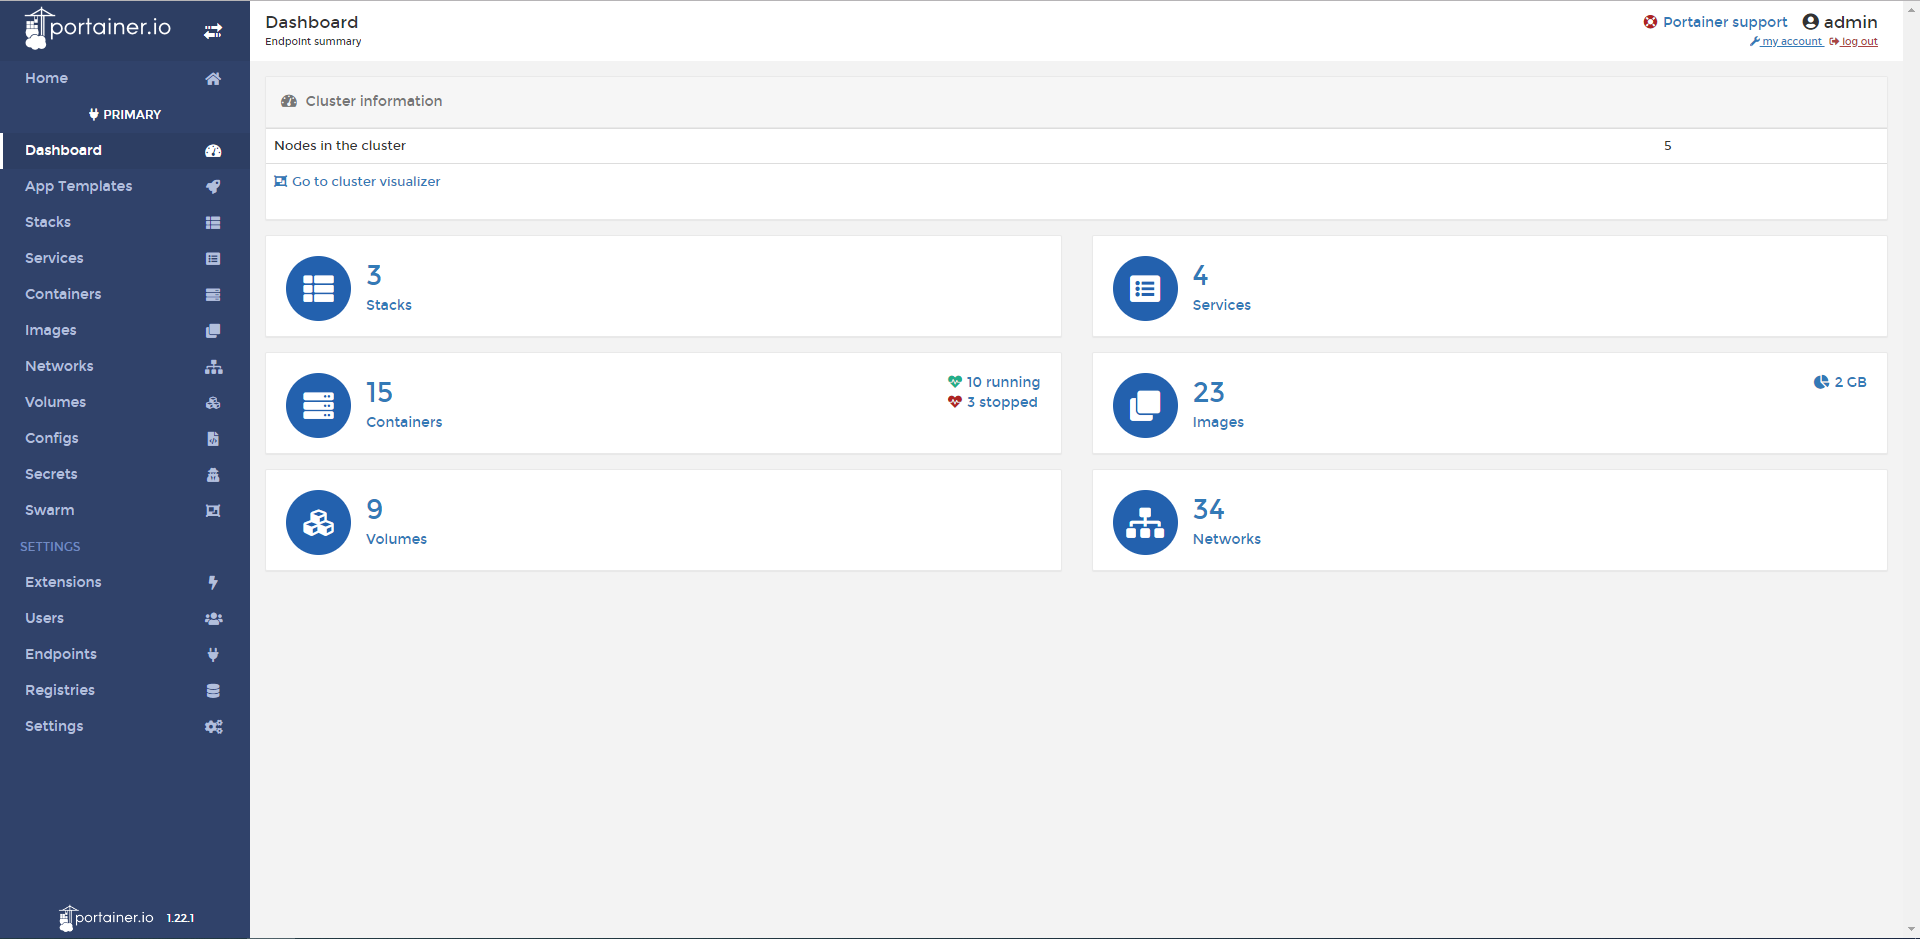
Wat is AKS
AkS staat voor Azure Kubernetes Service en is een managed service van Azure om je Kubernetes workload op te draaien. AKS is volledig in Azure geïntegreerd het maakt bijvoorbeeld gebruik van Azure monitoring en alerting. Je kunt bijvoorbeeld zien wat de status is van je cluster en hoe je containers draaien. Je kunt op container niveau inloggen en de logfiles per container bekijken. Ook kan je door middel van een terminal direct inloggen op de container. Azure DevOps heeft een hele goede integratie met AKS wat het mogelijk maakt om gemakkelijk applicaties te deployen op je Kubernetes cluster. In een andere blog zal ik in detail ingaan op devops in combinatie met Kubernetes.
Een overzicht van de monitoring in AKS.
Hoe installeer je AKS
AKS kun je volledig installeren door middel van de azure cli, voer de onderstaande commando’s uit om AKS te installeren.
1 2 3 4 5 6 7 8 9 10 11
# maak een resource groep aan. az group create --name kubernetesdemo --location west-europe
# maak een kubernetes cluster aan met twee workers. az aks create --resource-group kubernetesdemo --name demo --node-count 2 --enable-addons monitoring --generate-ssh-keys
# installeer kubectl als deze nog niet id geinstalleerd az aks install-cli
# haal de credentials op van je cluster en voeg deze toe aan je kubectl config az aks get-credentials --resource-group kubernetesdemo --name demo
Nu ben je klaar om applicaties te deployen op Kubernetes.
Hoe deploy je applicaties op Kubernetes
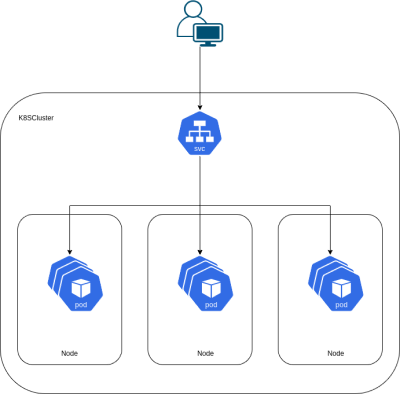
Kubernetes bestaat uit verschillende componenten, namelijk:
Een ingresscontroller is een soort van reverse proxy welke het verkeer op basis van de inkomende url het verkeer naar een bepaalde service kan sturen.
Een service is een object wat een pod exposed naar buiten. De reden dat je hier een apart object voor gebruikt wordt is dat als je een pod connect op het ipadres en de pod wordt verplaatst naar een andere node dan krijg je een nieuw ipadress.
Een pod is een wrapper om een of meerdere containers.
Een persistant volume claim is een reservering op een persistant volume.
Een persistant volume is een stuk storage wat beschikbaar is gesteld door een administrator.
Een secret is een object waar je gevoelige informatie opslaan en beheren, zoals wachtwoorden, OAuth-tokens en ssh-sleutels.
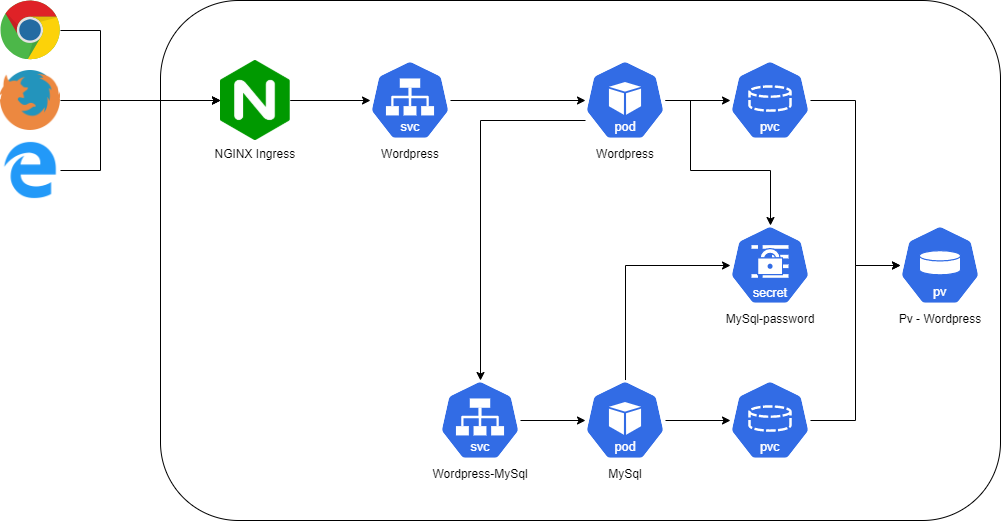
Om componenten uit te rollen op Kubernetes moeten we deze beschrijven in yaml. Deze yaml zal vervolgens worden geserialiseerd naar Kubernetes objecten. Om een voorbeeld wordpress applicatie uit te rollen hebben we de volgende yaml nodig:
We kunnen deze yaml uitvoeren door het volgende commando uit te voeren:
1
kubectl apply -f wordpress.yaml
Dit commando zal de yaml naar de api sturen van Kubernetes en de objecten aanmaken of updaten. Als alles goed is gegaan hebben we de onderstaande applicatie uitgerold:
Moet ik al die yaml zelf typen ?
De wordpress applicatie bestaat uit ongeveer 171 regels yaml code welke ook nog eens de juiste manier moet inspringen moet je dat echt allemaal zelf typen? Nou nee gelukkig niet, je kunt het grootste deel van de yaml laten genereren. Als voorbeeld nemen we een deployment object.
We maken hier een deployment aan met als naam my-dep en als image gebruiken we busybox. We doen een dry-run zodat we niets aanmaken en doen een output naar yaml. Dit alles schrijven we weg in een deployment.yaml bestand. Dit kunnen we doen voor al de objecten welke we nodig hebben.
Ik luister graag in de auto naar podcasts en een hele goede podcast is die van Bret Fisher. Hij is een docker captain en hij heeft elke week een live stream op youtube en hij maakt hier ook podcasts van alles gaat over docker, docker swarm en Kubernetes. https://www.bretfisher.com/podcast/
Als je wilt beginnen met Kubernetes op je computer dan is k3d een hele goede optie. Het is een gestripte versie van Kubernetes met een hele handige installer erbij. https://github.com/rancher/k3d
Als je aan de slag wilt met Kubernetes en niet meteen een cluster op je pc wilt installeren dan kun je terecht op Katakoda. Het is een omgeving waar je voor een uur een tijdelijk cluster kunt starten. Er zijn ook korte cursussen aanwezig welke je dan kunt uitvoeren op het cluster. https://www.katacoda.com/
Als je iets langer wilt spelen met Kubernetes dan kun je terecht op play with Kubernetes. Dit is ook een gevirtualiseerde omgeving welke 4 uur beschikbaar is. https://labs.play-with-k8s.com/
Mocht je een cursus willen doen kan ik je echt de cursussen aanraden van KodeKloud op udemy. Dit zijn echt hele duidelijke cursussen en als bonus heb je toegang tot een online leeromgeving waar je allerlei opdrachten moet uitvoeren. https://www.udemy.com/course/certified-kubernetes-application-developer/
Conclusie
Ondanks dat Kubernetes een enorme steile leercurve heeft is het eenmaal als je het door hebt een geweldig platform om je applicaties op te hosten. Je kunt er alle complexe applicaties op hosten maar je kunt er ook gewoon je Azure functions op hosten. Je hebt met Kubernetes een volledige gereedschapskist om al je oplossingen in te hosten. Met een hosted oplossing op bijv. AKS wordt al heel veel complexiteit uit handen genomen.
Niet lang geleden heb ik besloten om mij eens goed te gaan verdiepen in Docker. Je hoort het overal en het wordt steeds populairder en ik hoor steeds vaker dat het een goed alternatief is voor de huidige manier van werken namelijk Faas en Paas in een public cloud hierdoor ben ik nieuwsgierig geworden en wil ik eens kijken wat hier nu de voordelen van zijn. Ik ben begonnen om mij te certificeren, ik heb een cursus gevolgd en mijn examen met succes behaald. Ik vind het altijd belangrijk om te weten hoe iets in elkaar zit en waarom het zo in elkaar zit. Mijn idee is om een of meerdere productie applicaties op een Docker Swarm cluster te gaan draaien. In deze blog ga ik laten zien hoe ik een goede infrastructuur bouw om de applicaties te hosten.
De omgeving moest aan de volgende voorwaarden voldoen:
Er moeten meerdere web applicaties op kunnen draaien welke op poort 80 en 443 benaderd kunnen worden.
Alle web applicaties moeten draaien op SSL, dit moet mij zo min mogelijk werk kosten.
De oplossing moet schaalbaar zijn en bestand zijn tegen het uitvallen en/of offline gaan van servers.
Ik wil de oplossing kunnen hosten bij een Cloud provider, Hosting provider of lokaal om te kunnen testen.
Het beheren van de containers moet gemakkelijk en overzichtelijk zijn.
Aangezien ik een echte Hollander ben moeten de kosten ook een beetje beperkt blijven.
De oplossing welke ik heb gemaakt is een combinatie van Docker Swarm, Traefik, Let’s Encrypt en Portainer.
Wat is Docker Swarm
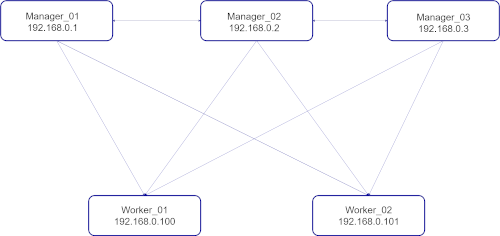
Docker Swarm is een tool waarmee je Docker-containers kunt beheren en schalen. Als je Docker installeert dan krijg je daar meteen Swarm bij. Docker Swarm is een standaard product van Docker wat bij elke installatie van Docker wordt meegeleverd. Met Docker Swarm kun je een cluster bouwen van verschillende virtuele machines deze worden hierna nodes genoemd. Hierop kunnen de Docker-containers worden gedeployed als een stack[^2] of een service[^1]. Als je een cluster wilt hebben wat een hoge beschikbaarheid heeft wordt aangeraden om minstens 3 manager nodes te hebben. Docker Swarm maakt namelijk gebruik van het Raft Consensus Algoritme, 1 manager is de leider van de swarm en de status van de manager wordt gesynchroniseerd over de overige managers. Mocht de leider niet meer beschikbaar zijn om wat voor reden dan ook kan een andere manager zijn taken over nemen.
Om te berekenen hoeveel managers er mogen uitvallen voordat het cluster niet meer kan functioneren wordt de volgende berekening gebruikt:
1
X = (N-1)/2
Bij dus een cluster van 3 manager mag er 1 manager uitvallen en zal het cluster nog steeds functioneren. Docker adviseert om niet meer dan 7 managers te gebruiken om performance issues met het synchroniseren te voorkomen. Voor meer informatie zie https://docs.docker.com/engine/swarm/raft/
Om een Docker Swarm cluster op te zetten kun je de volgende stappen uitvoeren:
Installeer 5 virtuele machine met bijv. Ubuntu server. Voor de 3 managers hebben we niet hele zware virtuele machines nodig. Een basic A1 1.75 GB RAM volstaat al voor een manager node. Voor de 2 worker nodes zou ik kiezen voor een virtuele machine met 8 GB RAM.
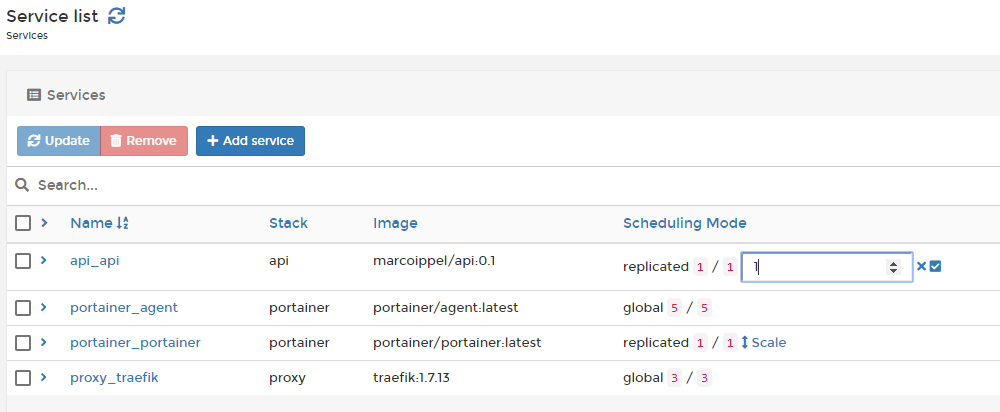
Docker Swarm zal niet automatisch schalen als de load op je applicatie hoger wordt, wil je meer containers uitrollen van je applicatie kun je dit doen door meer replica’s aan te maken. Als je bijv. de service api_api wilt opschalen naar 5 instanties kun je dit doen door middel van het volgende commando:
1
$ docker service scale api_api=5
Je kunt de schaling ook regelen in de UI van Portainer. Verderop in het artikel ga ik dieper in op hoe en wat Portainer is.
Mocht je nu toch te weinig capaciteit hebben in je cluster kun je eenvoudig een nieuwe virtuele machine inrichten met Ubuntu en Docker erop installeren. Hierna voer je het Docker Swarm join commando uit op de server en deze zal het bestaande cluster uitbreiden met de extra capaciteit. Om inzicht te krijgen in de performance van het cluster zijn monitoring applicaties beschikbaar, een van de bekendere is Prometheus. Het gaat in deze blog te ver om de ins en outs van Prometheus te behandelen. Mocht je meer informatie willen hebben over Prometheus zie https://prometheus.io/.
Mocht je Docker Swarm op Azure hebben uitgerold kun je gebruik maken van een vm scale sets om automatisch nodes bij je cluster te zetten. Ik heb hier verder nog geen ervaring mee maar ga hier zeker mee aan de slag.
Omdat ik Docker Swarm gebruik kan ik de volgende punten afvinken van mijn lijstje:
De oplossing moet schaalbaar zijn en bestand zijn tegen het uitvallen of offline gaan van servers. – In het cluster zitten 3 managers dus er kan er 1 offline gaan volgens de berekening: “3 managers - 1 = 2 2/2 = 1. – Ook hebben we 2 workers welke de containers kunnen hosten. Mocht er 1 offline gaan worden de containers opnieuw gestart op de andere node. – De manager heeft onder andere als taak om er voor te zorgen dat de containers draaien op 1 of meerdere nodes.
Ik wil de oplossing kunnen hosten bij een Cloud provider, Hosting provider of lokaal om te kunnen testen. – Omdat Docker Swarm standaard in elke Docker installatie zit kan het zonder verdere installatie van tools gebruikt worden overal waar je Docker hebt geïnstalleerd.
Wat is Let’s Encrypt
Let’s Encrypt is een certificaatautoriteit opgericht op 16 april 2016. Het geeft X.509 certificaten uit voor het Transport Layer Security (TLS) encryptie-protocol, zonder dat dit kosten met zich meebrengt. De certificaten worden uitgegeven via een geautomatiseerd proces dat is ontworpen om het tot nu toe complexe proces van handmatige validatie, ondertekening, installatie en hernieuwing van certificaten voor beveiligde websites te elimineren. (Wikipedia)
Traefik is een opensource router welke speciaal is ontworpen voor container oplossingen. Traefik wordt als global service op elke manager gedeployed op het cluster. Dit wil zeggen elke node met als rol manager krijgt een Traefik container. De reden dat Traefik op de manager nodes gedeployed dient te worden is dat de Docker api wordt uitgelezen. Zodra er een container bij komt en deze is geconfigureerd met de Traefik labels kan Traefik de labels van de container uitlezen en een virtuele host aanmaken voor de container en een SSL-certificaat aanvragen bij Let’s Encrypt. Zodoende is de container beschikbaar voor de buitenwereld met een SSL-certificaat.
Zie hier een voorbeeld Docker-Compose[^3] file om een Traefik container te deployen als stack[^2] op het Docker Swarm cluster.
Omdat ik Traefik gebruik als reverse proxy kan ik de volgende punten afvinken van mijn lijstje:
Er moeten meerdere web applicaties op kunnen draaien welke op poort 80 en 443 benaderd kunnen worden. – Doordat Traefik de labels van containers kan uitlezen maakt het automatisch virtuele hosts aan.
Alle webapplicaties moeten draaien op ssl, dit moet mij zo min mogelijk werk kosten. – Traefik ondersteund out of the box Let’s Encrypt SSL-certificaten.
Wat is Portainer
Portainer is een opensource web interface om je Docker te beheren zowel lokaal als remote. Met Portainer kun je de volgende Docker concepten beheren:
Containers
Images
Networks
Volumes
Services
Swarm Cluster
Portainer dient ook op een manager node geïnstalleerd te worden omdat Portainer ook via de Docker api het cluster beheerd. Tevens is er Portainer agent beschikbaar welke als global service gedeployed dient te worden op alle nodes zodat Portainer ook weet heeft welke containers op welke nodes draaien.
Zie hier een voorbeeld Docker-Compose[^3] file om een Portainer container en een Portainer agent te deployen als stack** op Docker Swarm.
Vanaf nu kunnen we Portainer benaderen op de URL https://portainer.yourdomain.com en kunnen we hier vandaan de rest van de services[^1] en stacks* deployen en beheren.
Een kleine samenvatting wat er gebeurt in dit Docker-Compose[^3] bestand:
We maken een container aan op basis van portainer/portainer en portainer/agent.
We publiceren poort 9000 voor de UI.
We regelen de Traefik configuratie in.
We mounten een volume voor de Portainer data.
We zorgen dat de Portainer container wordt uitgerold op een manager in het cluster en dat de agent op elke node in het cluster wordt uitgerold.
We maken een netwerk aan met de naam Private en koppelen dit aan de agent en de Portainer UI.
We koppelen de Portainer UI ook aan het netwerk Public wat we hebben aangemaakt in de Traefik deploy.
Omdat ik Portainer gebruik als beheer tool kan ik het laatste punt afvinken van mijn lijstje:
Het beheren van de containers moet gemakkelijk en overzichtelijk zijn.
De combinatie van Docker Swarm, Traefik, Let’s Encrypt en Portainer
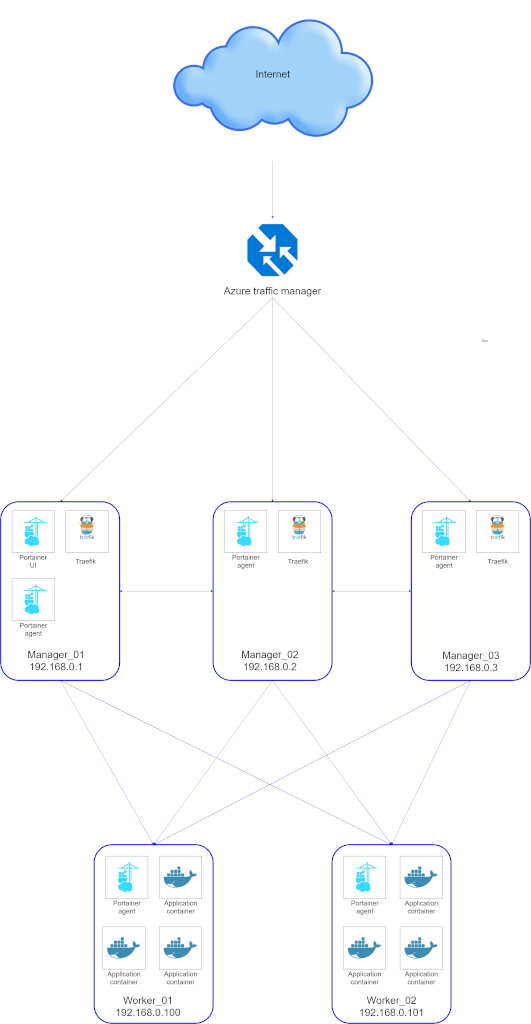
We hebben het hierboven gehad over Docker Swarm, Traefik, Let’s Encrypt en Portainer maar hoe ziet dat landschap er nu uit. In de volgende afbeelding heb ik een overzicht van het landschap zoals hierboven omschreven.
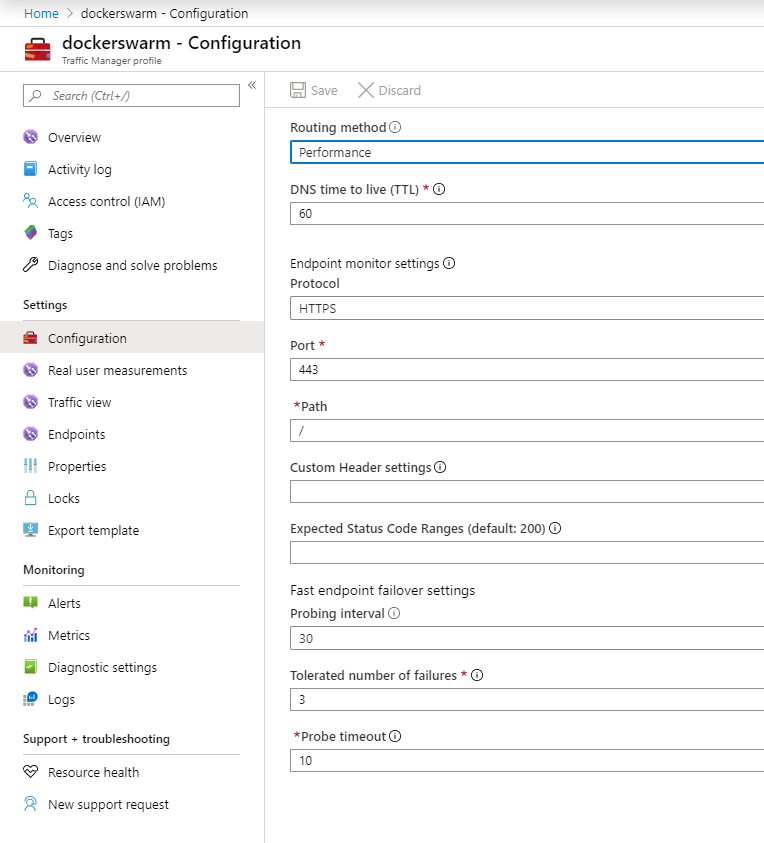
Ik heb gekozen om Azure Traffic Manager te gebruiken als loadbalancer voor om het verkeer te verdelen tussen de 3 verschillende managers. De gedachte hier achter is grotendeels dat het een erg goedkope service is in Azure en het werkt ook met externe endpoints. Je bent dus niet verplicht om je virtuele machines op Azure te moeten draaien dit geeft je weer de flexibiliteit om de machines overal te hosten.
Ik heb 3 endpoints gedefineerd in de Azure Traffic Manager 1 endpoint voor elke manager. Ik heb Azure Traffic Manager ingeregeld dat hij voor de beste performance kiest. Je kunt een protocol, poort en eventueel een pad opgeven wat hij moet controleren. Mocht het endpoint niet meer beschikbaar zijn zal er geen verkeer meer naar toe gestuurd worden. Dus als er een storing of een update is van een manager zal er geen downtime zijn in de applicaties. Als er een manager niet bereikbaar is hebben we nog 2 andere managers over welke het werk overnemen.
Hierna komt het verkeer binnen op de Traefik loadbalancer welke de Reverse proxy en de SSL-certificaten verzorgd. Traefik weet welk request er naar welke container gestuurd moet worden door middel van de labels welke zijn ingesteld bij het deployen van de stack[^2] of service[^1] en Docker maakt intern gebruikt van zijn eigen DNS server zodat er bekend is welke container er op welke node draait.
Zie hier een voorbeeld Docker-Compose[^3] file met labels om een Docker container met een webapplicatie te deployen als stack** op een Docker Swarm cluster.
Het Docker-Compose[^3] bestand kan in Portainer als stack gedeployed worden op het cluster.
Conclusie
Ik vind dat de combinatie van de verschillende tools een goede basis is voor het applicatielandschap. Het is flexibel, schaalbaar en niet bijzonder complex. Docker Swarm staat ook bekend om zijn eenvoudigheid. Aangezien ik geen infrastructuur met honderden nodes en duizenden containers hoef te hosten is dit een hele geschikte oplossing. Docker Swarm heeft niet een hele steile leercurve dus je kunt er al snel mee aan de slag. Door de reverse proxy van Traefik kunnen virtuele hosts automatisch worden aangemaakt en is SSL meteen geregeld. Met Portainer als UI voor het beheer kun je in een mum van tijd een heel applicatie landschap optuigen zonder al te veel tijd en kosten te moeten investeren.
Om het laatste puntje van mijn lijstje af te kunnen vinken heb ik hier een klein overzicht met een kosten indicatie van 3 verschillende providers waar je een docker Swarm cluster kan hosten. De totaal kosten welke hieronder staan zijn gebaseerd op 3 manager nodes en 2 worker nodes. De Manager nodes hebben allemaal 2 gig geheugen en de workers hebben 8 gig geheugen.
Zoals je ziet in het overzicht 3 providers waarvan Digital Ocean en Azure echt serieuze cloud providers zijn met veel meer services dan alleen virtuele machines. Azure biedt een uptime van 99,9% en Digital Ocean een uptime van 99,99% dit is ook iets waar je voor betaald. Zo zie je dat voor iedereen zijn portemonnee een oplossing is.
Mocht je toch niet tevreden zijn met de service van je hosting provider dan is het heel gemakkelijk om je infrastructuur op te pakken en deze gewoon bij een andere provider te hosten. Het zijn namelijk gewoon container images en yaml files voor de configuratie en je bent in een mum van tijd weer up en running.
[^1]: Een service is een image van een microservice in de context van een grotere toepassing. [^2]: Een stack is een Docker-compose file met services gedefinieerd welke in een keer uitgerold kan worden. [^3]: Docker-Compose is een hulpmiddel voor het definiëren en uitvoeren van Docker-toepassingen met meerdere containers.
Microsoft heeft goed werk verricht voor ons als SPFx developers om met gulp serve snel te kunnen ontwikkelen binnen SharePoint Online. Je kunt lokaal je webpart testen en zelfs verbinden met live data binnen SharePoint Online zonder dat het beschikbaar is voor anderen.
Als SPFx developer leveren we uiteindelijk ons SharePoint Online maatwerk aan onze klant. We zijn dan gewend de commando’s als gulp bundle -ship en gulp package-solution -ship uit te voeren en te uploaden naar onze App Catalog en te “Implementeren”. Maar hiervoor heb je rechten nodig en niet altijd ben je daarvoor bevoegd. Deze verantwoording is vaak belegd bij de applicatiebeheerder die verantwoordelijk is voor een stabiele applicatie.
Hoe fijn zou het zijn als je dit samen met de applicatiebeheerder kunt inregelen via Azure DevOps Continuous Integration en Deployment. Bij de Collaboration Summit in Wiesbaden in mei 2019 werd gedemonstreerd hoe dit ingeregeld kan worden. In deze blog ga ik dit met mijn Visual Studio Enterprise subscription in mijn Office 365 Developer tenant inrichten. Het doel van deel 1 van deze blog is wanneer dingen gecommit worden in de master-branch, dat die code gebuild wordt en de artifact ‘myproject.sppkg’ te downloaden is. In de volgende blog (Part 2) gaan we de installatie van deze package automatiseren met Continuous Deployment.
Azure DevOps - Voorbereiding Voordat we de pipelines gaan inrichten, hebben we de volgende uitgangspunten:
Broncode van een SPFx-webpart solution staat in een Git-repository in Azure DevOps.
De SPFx-webpart solution is buildable zonder fouten.
Je heb rechten binnen AzureDevOps om een Build-pipeline in te richten.
Azure DevOps - Maken van de Build-pipeline voor een SharePoint Framework project Er zijn verschillende manieren om een build-pipeline op te zetten. Als je voor het eerst begint met build-pipelines, dan is de simpelste manier om de ‘classic editor’ te gebruiken en hiermee te experimenteren. De definitie en alle wijzigingen die je op de build pipeline maakt staan los van de source code. De andere manier is d.m.v. een YAML-file die wel naast de source code staat en dus mee moet komen in je commit. In deze blog maken we een SharePoint Framework Build pipeline dmv een YAML-file:
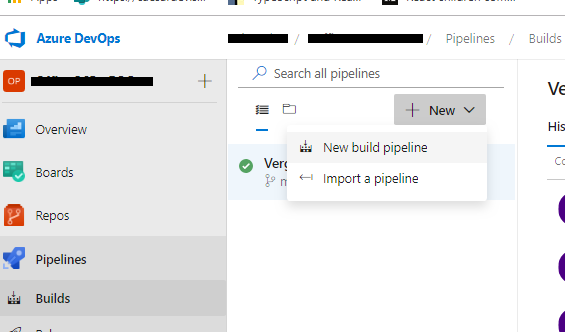
Ga naar je Azure DevOps project en ga naar ‘Pipelines’ -> ‘Build’.
Maak een nieuwe Build pipeline aan.
Kies vervolgens bij ‘Where is your code?’ voor ‘Azure Repos Git’ als je code standaard in Azure DevOps staat met Git.
Kies vervolgens je Repository.
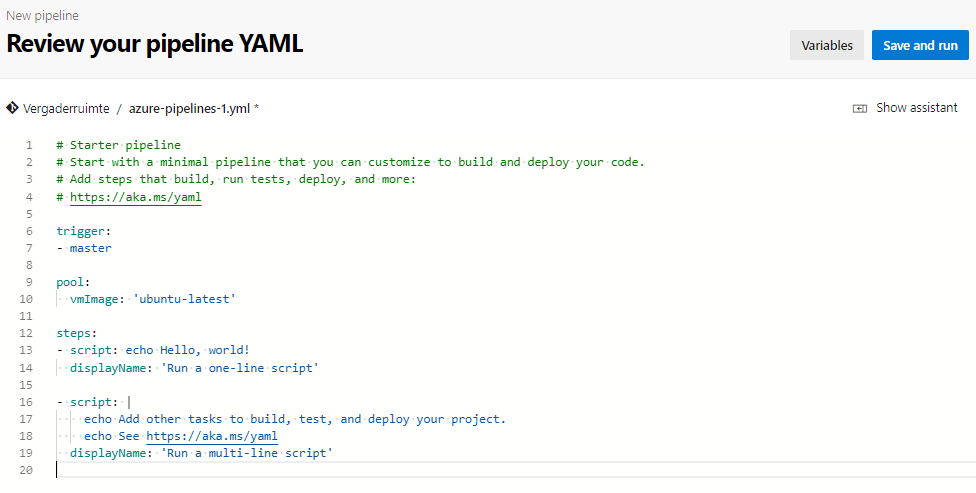
Kies vervolgens bij ‘Configure your pipeline’ voor de optie ‘Starter pipeline’. Figuur 1: Initiële yaml-code
# Deze build start wanneer er een wijziging op de 'master'-branch wordt gedaan. trigger: - master
# We gebruiken een hosted VM met Visual Studio 2017 op een Windows 2016 server van Azure pool: vmImage: 'vs2017-win2016' steps: # Installeer Node 8.x - task: UseNode@1 displayName: 'Install Node 8.x' inputs: version: '8.x' # Installeer alle packages van het project met Node - task: Npm@1 displayName: 'Run ''npm install''' inputs: command: 'install' # Gulp-commando: Verzamelen van alle broncode van het SharePoint Framework-project - task: Gulp@1 displayName: 'Run ''gulp bundle --ship''' inputs: gulpFile: 'gulpfile.js' targets: 'bundle' arguments: '--ship' enableCodeCoverage: false # Gulp-commando: Maak een solution package van het SharePoint Framework-project - task: Gulp@1 displayName: 'Run ''gulp package-solution --ship''' inputs: gulpFile: 'gulpfile.js' targets: 'package-solution' arguments: '--ship' enableCodeCoverage: false # Publiceer de SharePoint Solution Package onder de artifact naam 'SPFx-myproject' - task: PublishPipelineArtifact@1 displayName: 'Publish ''MyProject'' to artifact ''SPFx-myproject''' inputs: targetPath: 'sharepoint/solution/myproject-webpart.sppkg' artifact: 'SPFx-myproject'
Figuur 2: Standaard yaml build pipeline voor ‘myproject’
Pas indien nodig alle ‘myproject’ teksten aan naar wens.
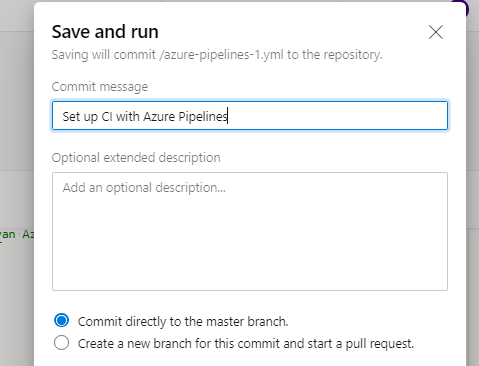
Klik op ‘Save & Run’ Figuur 3: Save and run build pipeline
Je ziet hier dat je je wijziging direct in de master-branch kan aanbrengen of apart in een Pull Request in een nieuwe branch. Voor nu kiezen we voor ‘Commit directly to the master branch’.
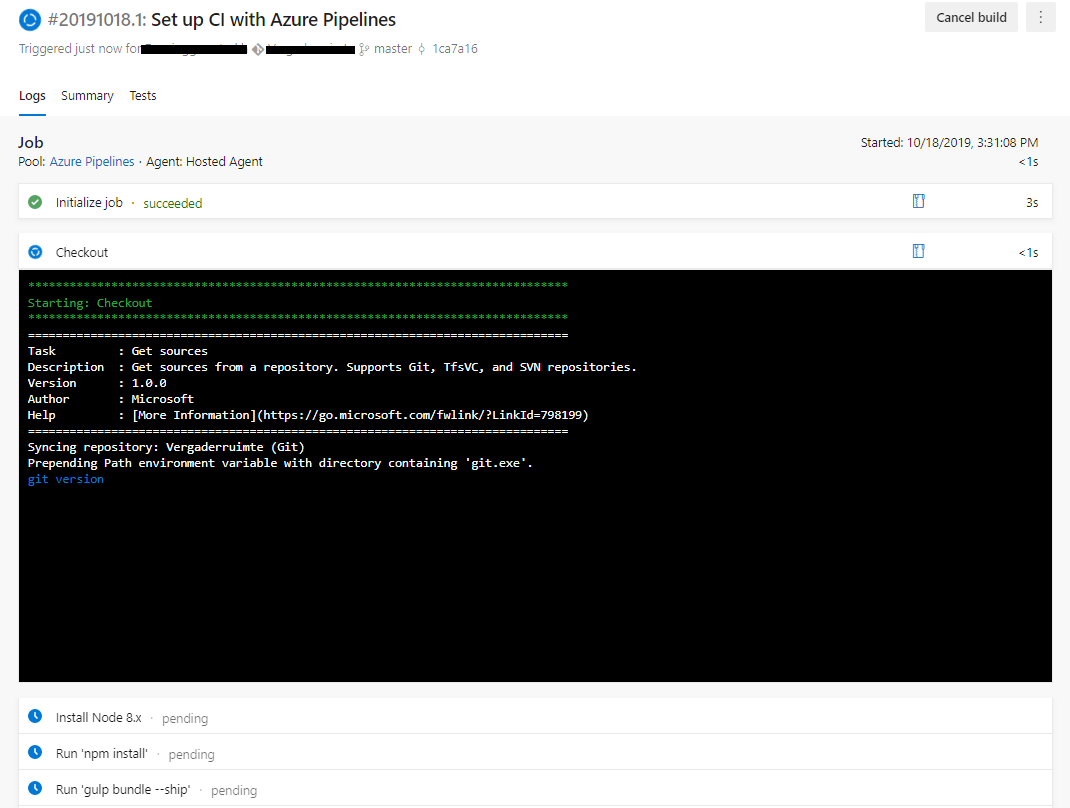
De build gaat van start: Figuur 4: Azure built nu MyProject-artifact
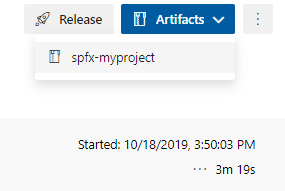
Na enkele minuten is de build klaar en verschijnt rechtsboven in het scherm de knop ‘Artifacts’. Onder deze knop kan de package gedownload worden. Figuur 5: Artifact is gebuild en te downloaden
In de volgende blog gaan we deze package installeren via Continuous Deployment.
Net als in mijn vorige blog post heb ik een Proof of Concept gemaakt om grote hoeveelheden XML bestanden te transformeren, het gaat dan 3000 bestanden per keer met een totale grote van 18 gigabyte. Voor dit artikel kan ik wegens privacy redenen niet de echte data gebruiken en heb ik een dataset gebruikt van https://www.kaggle.com/datasets. Het gaat hier om een dataset van landen en de wijnen.
Het doel is om de wijnen uit de XML dump te halen en deze om te zetten naar een JSON formaat en deze bestanden te uploaden in een blob container. We krijgen dus per wijn een JSON bestand in een blob container. Dit alles moet gebeuren op basis Azure Batch met een Azure Function als orchestrator.
Wat is de opzet van de POC
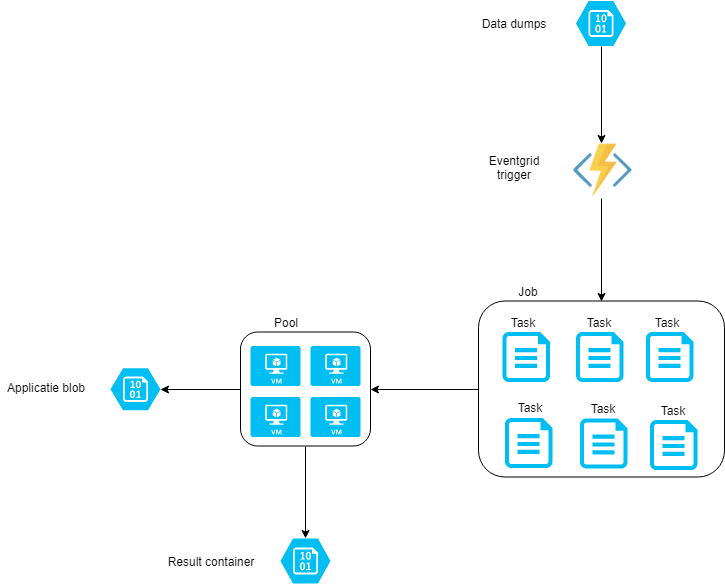
We gaan de XML bestanden transformeren doormiddel van een Azure Batch component en we starten en beheren de Azure Batch doormiddel van een Azure Function. De Azure Function zal de XML bestanden toevoegen aan een Job in Azure Batch doormiddel van een event grid trigger en via een httptrigger is de voortgang te zien van het batch proces.
Wat is Azure Batch
Azure Batch is plat gezegd eigenlijk een beheer tool voor virtuele machines. Elk van deze machines kan een taak oppakken en dit als input gebruiken voor een commandline applicatie en het resultaat uploaden in bijvoorbeeld een blob container.
Een Task is een opdracht welke uitgevoerd dient te worden op een node.
Een Job is een verzameling van tasks. Aan een Job hangt ook een Pool.
Een Pool is een verzameling van nodes.
Een Node is een virtuele machine welke een van de tasks gaat uitvoeren.
Ik heb 40 bestanden met landen en wijnen. 1 bestand is ongeveer 75 mb groot. Voor testdoeleinden zijn dit dezelfde bestanden met een andere naam. Dit is meer om een gelijkwaardige load op de functie te krijgen als bij de echte POC.
Ik heb een Azure Function welke een event grid trigger heeft welke afgaat op het moment dat er een bestand wordt geupload in de blobcontainer.
1 2 3 4 5 6 7 8 9 10 11 12
[FunctionName("BatchOrchestrator")] publicstaticasync Task Run( [EventGridTrigger] EventGridEvent eventGridEvent, ExecutionContext context, ILogger log) { var data = JsonConvert.DeserializeObject<StorageBlobCreatedEventData>(eventGridEvent.Data.ToString()); string name = data.Url.Split('/').Last();
De bestandsnaam wordt uit de URL gehaald en doorgestuurd naar de methode RunBatch. De methode RunBatch initialiseert een BatchClient met de credentials welke opgegeven zij in de config.
BatchSharedKeyCredentials credentials = new BatchSharedKeyCredentials(config["BatchUrl"], config["BatchAccount"], config["BatchKey"]); using (BatchClient batchClient = BatchClient.Open(credentials)) { } }
Hierna gaan we kijken of er al een job bestaat in het Azure Batch Account. Als er al een job bestaat en hij is nog actief of wordt aangemaakt voegen we hier een task aan toe. Als er geen job actief is of wordt opgestart dan maken we een Job aan. Dit gebeurt in de CreateJob methode.
We specificeren hoeveel tasks er per node gedraaid mogen worden in dit geval 4. Er zullen dus 4 tasks per keer op de node worden gestart.
We specificeren welke applicatie er op de node gedraaid dient te worden. Dit moet een applicatie of script zijn welke via de commandline te draaien is. Deze applicatie kan als een zip bestand worden gupload in de portal.
We zetten de lifetime op PoolLifetimeOption.Job dit wil zeggen zodra alle tasks in de Job klaar zijn zal de pool verwijdert worden en zul je dus ook niet meer betalen voor de virtuele machines.
Nu we een Pool hebben kunnen we deze koppelen aan de Job. De CreateJob methode maakt een unieke naam aan voor de job doormiddel van een timestamp te prefixen met “WineConverter”.
We controlleren eerst of de task al is aangemaakt en is toegevoegd aan de job, zoniet dan voegen we hem toe. De naam van de task mag alleen letters en cijfers bevatten en een koppelteken en underscore.
Ook stellen we in welke package de task moet starten met welke argumenten. Hier starten we converter.exe met als argument een naam van de blob (in dit geval een XML bestand met wijn data).
De converter.exe bevat alle logica om de xml te verwerken en het resultaat te uploaden in een Azure blob container. In de Azure portal kan je een package uploaden welke op de nodes geinstalleerd moeten worden. Meer informatie over hoe packages werken met Azure batch is te vinden op: https://docs.microsoft.com/en-us/azure/batch/batch-application-packages
if (tasks.Any(x => x.Id == taskId)) { Console.WriteLine($"Task with id: {taskId} all ready exists"); return; }
batchClient.JobOperations.AddTask(jobId, new CloudTask(taskId, $"cmd /c %AZ_BATCH_APP_PACKAGE_CONVERTER%\\converter.exe -name {blobName}")); }
De volledige code
Zie hieronder de volledige code. Er is een extra function aan toegevoegd met een httptrigger zodra je deze aanroept worden alle jobs met de bijhorende tasks weergegeven en de status van de tasks. Het endpoint is nu niet beveiligd maar dit is omdat het een demo is.
using System; using System.Collections.Generic; using System.IO; using System.Linq; using System.Net.Http; using System.Threading.Tasks; using Microsoft.Azure.Batch; using Microsoft.Azure.Batch.Auth; using Microsoft.Azure.Batch.Common; using Microsoft.Azure.WebJobs; using Microsoft.Azure.WebJobs.Extensions.Http; using Microsoft.Extensions.Configuration; using Microsoft.Extensions.Logging; using Newtonsoft.Json; using JobState = Microsoft.Azure.Batch.Common.JobState;
namespaceWineConverter { publicstaticclassBatchOrchestrator { [FunctionName("BatchOrchestrator")] publicstaticasync Task Run( [EventGridTrigger] EventGridEvent eventGridEvent, ExecutionContext context, ILogger log) { var data = JsonConvert.DeserializeObject<StorageBlobCreatedEventData>(eventGridEvent.Data.ToString()); string name = data.Url.Split('/').Last();
var config = ReadSettings(context); BatchSharedKeyCredentials credentials = new BatchSharedKeyCredentials(config["BatchUrl"], config["BatchAccount"], config["BatchKey"]); using (BatchClient batchClient = BatchClient.Open(credentials)) { IPagedEnumerable<CloudJob> jobs = batchClient.JobOperations.ListJobs(); if (jobs.Any()) {
foreach (CloudJob cloudJob in jobs.ToList()) { jobList.Add(new Job() { Id = cloudJob.Id, Name = cloudJob.DisplayName, Status = cloudJob.State.ToString(), Tasks = cloudJob.ListTasks().Select(task => new JobTask() { Id = task.Id, Name = task.DisplayName, Status = task.State.ToString() }).ToList() }); } } }
publicclassJobTask { publicstring Id { get; set; } publicstring Name { get; set; } publicstring Status { get; set; } }
publicclassJob { publicstring Id { get; set; } publicstring Name { get; set; } publicstring Status { get; set; } public List<JobTask> Tasks { get; set; } } }
Conclusie
Azure batch is echt een serieuze keuze als je grote hoeveelheden data moet verwerken en je wilt in controle zijn wat er allemaal gebeurt. Je kan zowel horizontaal als verticaal schalen en het aantal nodes wat het werk kan doen is standaard 20 maar je kunt een request doen voor meer nodes. Voor de recource limieten check de documentatie https://docs.microsoft.com/en-us/azure/batch/batch-quota-limit.
Ik ken zelf weinig projecten waar ze Azure batch gebruiken maar ik ben echt onder de indruk hoe simpel en krachtig Azure batch is plus je betaald alleen voor de tijd dat de nodes ook echt iets doen dus geen vaste maandelijkse kosten.
Deze POC heeft het qua performance zijn doel wel behaald wat we voor ogen hadden alleen het bevat toch net te veel stappen om het volledig via CI/CD gemakkelijk te deployen.
In een volgende blog zal ik de uiteindelijke oplossing uitwerken met verschillende functie apps op een consumption plan welke aan alle eisen voldoet.
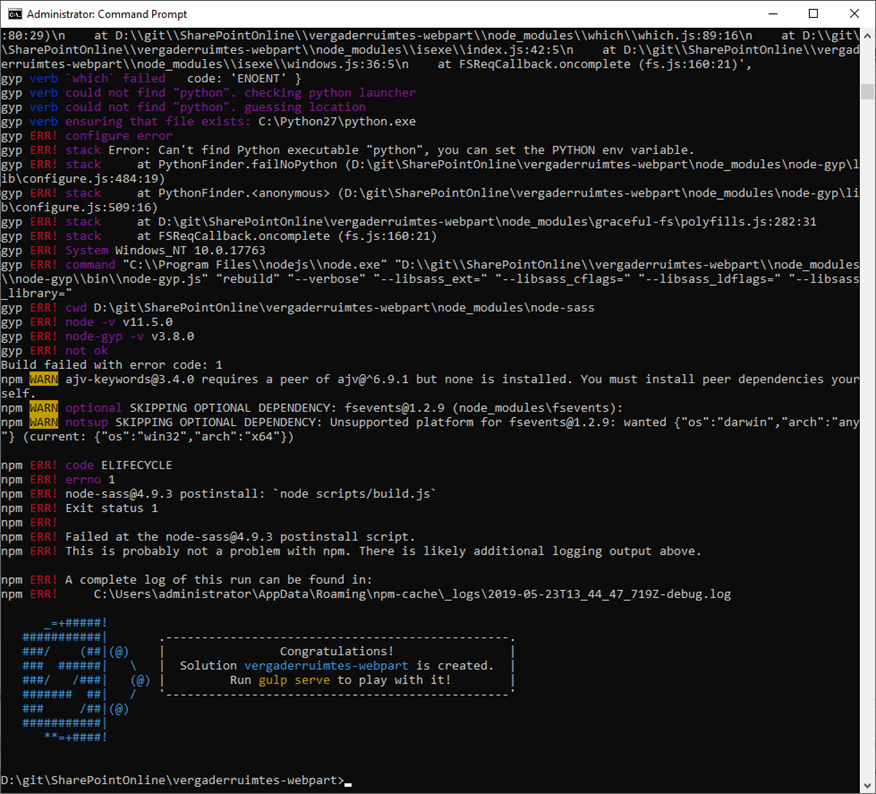
Voor een klant zijn we begonnen met het bouwen van hun eerste SharePoint Online webpart. Binnen een Citrix omgeving waar we een Developer VM ter beschikking hebben, moeten we eerst een ontwikkelomgeving opzetten. Voor SharePoint on-premises developers is het een enorme omslag hoe dingen nu ontwikkeld worden met Javascript. Je krijgt te maken met NodeJS, NPM, gulp, Yeoman, etc. om maar wat termen te noemen. Als je ervaring hebt met frontend-ontwikkelen, dan ligt de moeilijkheid in het begrijpen van de (misschien onlogische) concepten van SharePoint Online.
Door simpelweg de instructies te volgen die te vinden is op https://docs.microsoft.com kom je er niet helemaal. Wat ik recent bent tegengekomen is dat er fouten staan omdat de gebruikte tooling online vernieuwd zijn, maar nog niet verwerkt zijn in het SharePoint Framework. Dit geeft als resultaat dat de uitgevoerde commando’s succesvol gelukt zijn met fouten….
De oplossing: Wees niet eigenwijs door altijd de laatste versie te downloaden omdat het beter is (I did this…), maar download specifieke oude versies want onderhoud van gerelateerde componenten is complex. Je doel is om een webpart te maken wat uiteindelijk javascript is. Ik vertrouw erop dat Microsoft dit op zijn tijd zal vernieuwen.
Om heel wat frustraties (die ik had) je te besparen, heb ik de volgende stappen opgesteld zodat je als startende SPFx-developer snel van start kan gaan met het SharePoint Framework:
Noteer de benodigde urls die je vaak nodig zult hebben Developer-account: [my-name]@[my-tenant].onmicrosoft.com SharePoint Admin-Tenant: https://[my-tenant]-admin.sharepoint.com App Catalog: https://[my-tenant].sharepoint.com/sites/appcatalog/SitePages/Introductiepagina.aspx (Modern) Developer Site: https://[my-tenant].sharepoint.com/sites/DeveloperModern
In de command-prompt, maak nieuwe folder aan waar je de sources wilt hebben. Voor de niet-DOS generatie developers hier de commando’s om op je C-schijf in de root een map aan te maken: C: md myfirstwebpart cd myfirstwebpart
SharePoint project aanmaken met volgende commando: yo @microsoft/sharepoint Beantwoord vervolgens de vragen die gesteld worden.
Voor de zekerheid alle packages installeren van dit project met volgende commando: Npm install
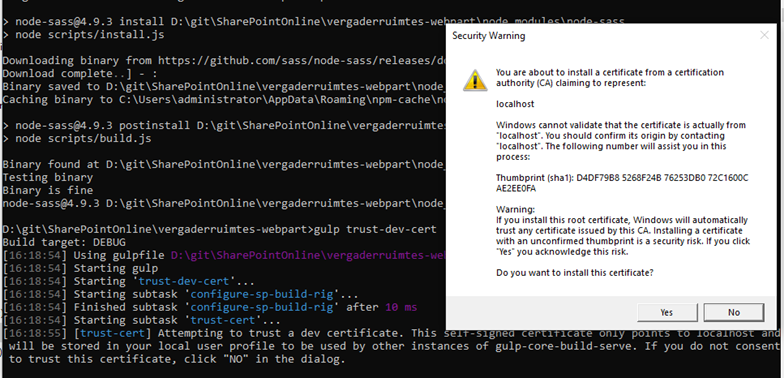
Development certificaat vertrouwen met volgende commando: gulp trust-dev-cert Opmerking: Op de site van docs.microsoft.com stond deze stap boven het maken van een nieuw SPFx-project met yo@microsoft/sharepoint. Niet handig als je nog niet weet dat je een nieuw project gaat maken en zelf mag kiezen.
Bundel alle assets voor development doeleinde (gehost op https://localhost:xxxx) met volgende commando: gulp bundle
Maak de SharePoint-package voor development doeleinde (gehost op https://localhost:xxxx) met volgende commando: gulp package-solution De uitvoer van dit commando komt terecht in de map ./sharepoint/solution De SharePoint-package is het bestand eindigend met .sppkg.
Start je lokale webserver en de Workbench met het volgende commando: Gulp serve
Nu kun je aan de slag met Workbench welke automatisch gestart wordt. Je kunt het webpart toevoegen op de pagina en beginnen met ontwikkelen in Visual Studio Code. Let op: Je hebt nu geen beschikking tot data of SharePoint API’s. Het is de bedoeling dat je eerst de UI ontwikkelt en fictieve data maakt en gebruikt. Zorg dat gulp serve in de command-prompt blijft draaien. Dit is je lokale webserver van je webpart! Elke keer als je iets aanpast, compileert gulp serve je code en ververst automatisch in je browser de Workbench.
Klaar met mockdata en wil je ontwikkelen in SharePoint Online zodat je over de echte data beschikt van Graph en SharePoint?
Voer de volgende commando’s uit: gulp bundle gulp package-solution
Upload en ‘implementeer’ (installeer) de SharePoint-package (.sppkg) naar je eerder ingerichte App-Catalog site: bijv.: https://[my-tenant].sharepoint.com/sites/appcatalog/AppCatalog/Forms/AllItems.aspx
Nu kun je de app installeren op elke SharePoint site als site beheerder en vervolgens de webpart op een willekeurige plek in je site plaatsen. Je hebt dan ook volledig beschikking tot de API’s van Graph en SharePoint. Let op dat je webpart ‘werkt’ zolang gulp serve op de achtergrond draait en als iemand op een ander apparaat dezelfde pagina benaderdt, deze een technische foutmelding krijgt
Klaar met ontwikkelen en wil je je ontwikkelde webpart deployen naar Test, Acceptatie en Productie?
Voer de volgende commando’s uit: gulp bundle –ship gulp package-solution –ship
Upload en ‘implementeer’ (installeer) de SharePoint-package (.sppkg) naar de App-Catalog site van gewenste tenant: bijv.: https://[test/acc/prod-tenant].sharepoint.com/sites/appcatalog/AppCatalog/Forms/AllItems.aspx
Nu kun je de app installeren op elke SharePoint site als site beheerder en vervolgens de webpart op een willekeurige plek in je site plaatsen. Iedereen kan de webpart gebruiken en ook op telefoon en tablet via de SharePoint App.
In the ideal situation, we would like to release our new code with zero downtime. It is very possible that this can be done by releasing to a separate staging slot and then swapping this with the production slot. Should be zero downtime. However, there are always cases where this does not apply, where downtime can only be avoided through tedious manual intervention and multiple failover steps. Say we have an application that runs globally and we have such a case. Or if we just really, really want to make sure that our customers have as few problems as possible.
In this case, we propose to use the follow-the-moon (FTM) release schedule. This means releasing our application at times in different regions where for each region, the time we release at is the time where it is least likely that a customer is using the application. And yes, we know that the moon can be visible during the day, but you get the sentiment.
You will still want to have the entry point of your application to send your users to a region you host your application in that is 1) available and 2) close to the user. Taking a region down to release a new version of your application is still not desired, as it will either not be rerouted (e.g. because of caching) and thus will result in routing to an application that is down, or be rerouted to a region where the distance can cause undesirable increases in response times. Thus, we would like to make sure to do the release at a time where it is convenient per region, not all at once.
In the FTM release schedule, we may, for example, set the release time for each region to 03:00 local time. Once we approve the continuation of the release, the schedule will start to kick in and release our application to all regions at their respective optimal times. This means that our application is rolled out automatically, in different time zones, without the need for manual intervention in our multi-region roll-out process.
Getting our application to production globally could involve the following:
Set up a continuous integration build to automate building your code
Set up an automatic release pipeline, automatically started from artifacts, going through multiple stages with certain filters on source branches
Set up the follow-the-moon release schedule for our production releases to multiple regions
Getting to the moon
For this part, we assume your project has some code and a build is in place to create artifacts which we can work with.
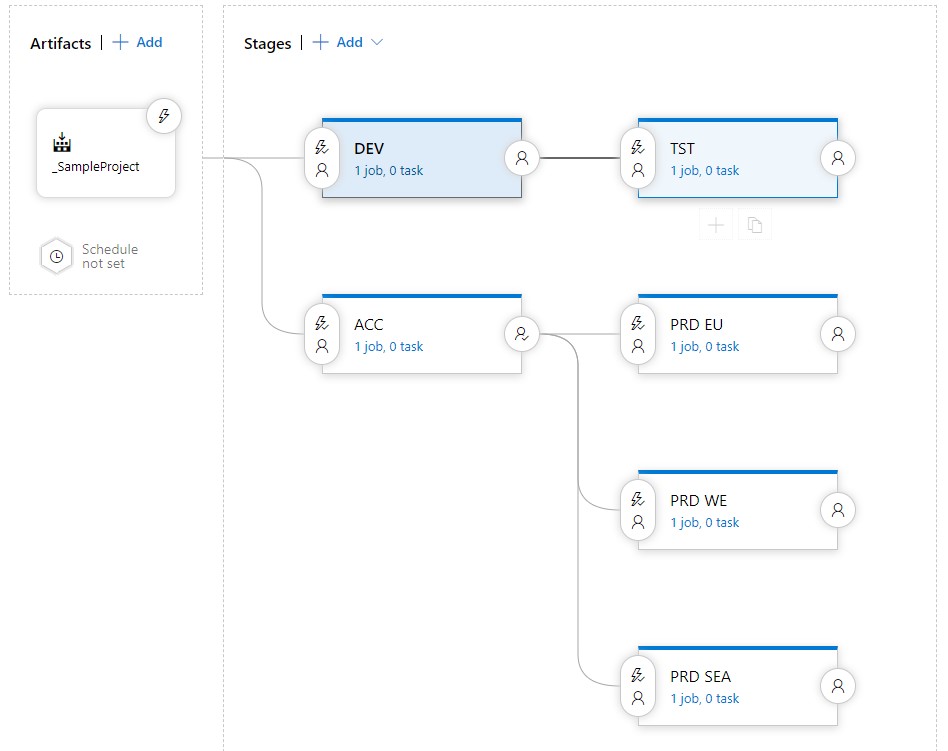
Suppose our release pipeline looks like this:
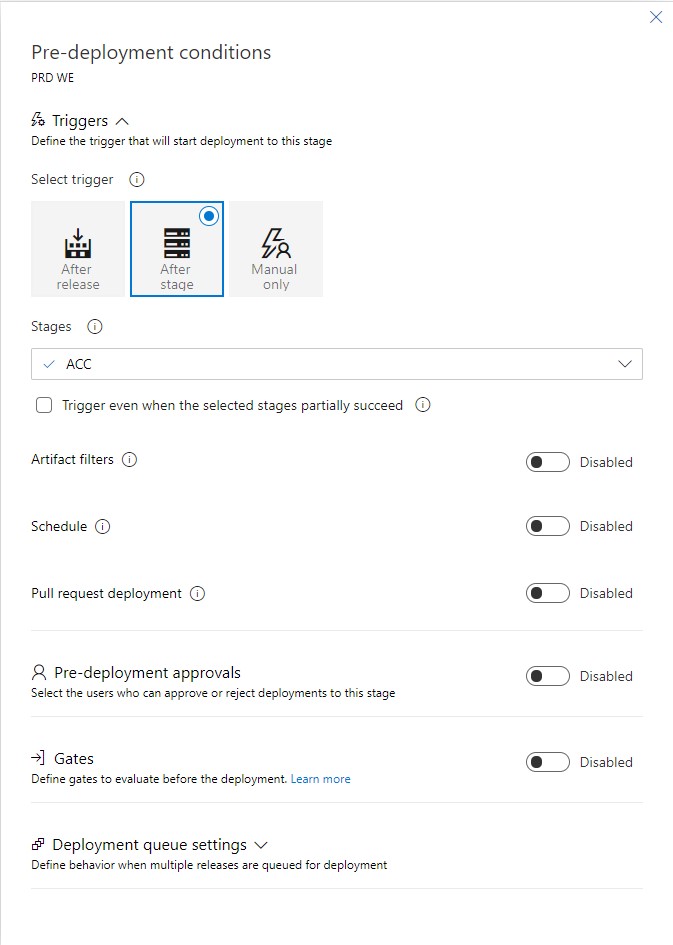
We have our artifact as an entry point. We have our DEV and TST environments hooked up for continuous releases based on the develop branch. Finally, we have our ACC and PRD environments hooked up for continuous releases based on the master branch. In this case, we want to double-check the ACC environment before actually rolling out to PRD, so we add a post-deployment approval condition there.
Now, if we click on the pre-deployment conditions, we see the following menu:
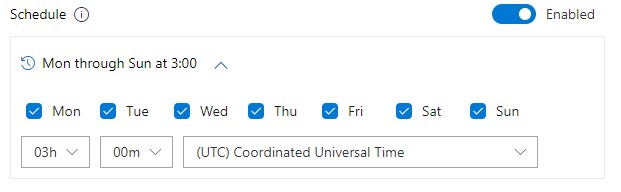
We enable the schedule and set it to the time where we expect our users to not use the application in that region. For example, in the WE (West Europe) Azure region, at 03:00 would be when we expect our customers to sleep, so we may decide that this is the right time to deploy.
After we have done this for all the production environments, we have successfully implemented the FTM release schedule! Do note that using swap slots is still what you want to do. However, this principle gives us a little bit of extra safety when releasing code that may otherwise cause downtime.
6 Mei tot 8 Mei vond het jaarlijkse event voor Microsoft ontwikkelaars plaats, namelijk: Microsoft Build. Cloud Republic heeft dit evenement op de voet gevolgd en heeft daarbij een selectie gemaakt van de highlights die wij de moeite waard vinden.
Gaat u zitten voor grofweg een werkdag aan video’s. Even een avondje geen Netflix maar Channel 9!
Vision Keynote - Satya Nadella De keynote van Satya moet je natuurlijk gezien hebben. Hij was niet zo technisch als andere jaren maar zeker de moeite waard om te bekijken. In grote lijnen legt Satya uit welke koers Microsoft vaart. Altijd goed om dat scherp te hebben.
Microsoft Azure: Empowering Every Developer - Scott Guthrie Scott Guthrie is de grote baas van Azure. De populariteit van Azure staat als een paal boven water. In deze sessie gaat Scott door een scala van nieuwe features voor Azure en AzureDevops.
.NET Platform Overview and Roadmap - Scott Hunter and Scott Hanselman .NET is en blijft toch wel het development platform van Microsoft. In deze sessie nemen de “Lesser Scotts” je mee in de nieuwe features van .NET (Core) en geven ze een inkijkje in de toekomst van .NET. (Deze sessie bevat informatie over de aankondiging van .NET 5.0)
Look back up C# - Andres Hejlsberg Andres Hejlsberg is één van de “Technical Fellows” van Microsoft. Met andere woorden hij is de God Father van C# en TypeScript. Zijn visie op programmeertalen is ongekend, als je iets wilt leren over language design, compilers en dergelijke. Kijk dan zijn sessies.
Whats new in TypeScript - Daniel Rosenwasser Wie schrijft er nog plain JavaScript? Velen zijn al over naar TypeScript, wij ook. Daniel Rosenwasser neemt je mee in de wonderen wereld van TypeScript. Ik durf te wedden dat je 50% van de TypeScript features nog niet gebruikt.
Serverless web apps with Blazor, Azure Functions… - Jeff Hollan Wil je een sessie met veel nieuwe techniek? Kijk dan deze sessie van Jeff Holan. Jeff is de Program Manager van Azure Functions en bouwt in deze sessie een Blazor (C# Web Assembly) applicatie bovenop Azure Functions.
Inside Azure datacenter architecture - Mark Russinovich Deze sessie moet je gewoon kijken als je ontwikkelt in Azure. Mark Russinovich is de CTO van Azure en hij geeft je in deze sessie een inkijkje in de data centers van Azure.
Voor een klant heb ik een Proof of Concept gemaakt om grote hoeveelheden XML bestanden te transformeren het gaat dan 3000 bestanden per keer met een totale grote van 18 gigabyte. Voor dit artikel kan ik wegens privacy niet de echte data gebruiken en heb ik een dataset gebruikt van https://www.kaggle.com/datasets het gaat hier om een dataset met landen en de wijnen welke uit het desbetreffende land komen.
Het doel is om de wijnen uit de XML dump te halen en deze om te zetten naar een JSON formaat en deze bestanden te uploaden in een blob container. We krijgen dus per wijn een JSON bestand in een blob container. Dit alles moet gebeuren op basis van durable functions en een constumption plan.
Ik heb 40 bestanden met landen en wijnen. 1 bestand is ongeveer 75 mb groot. Voor test doeleinde zijn dit dezelfde bestanden met een andere naam. Dit is meer om een gelijkwaardige load op de functie te krijgen als bij de echte POC.
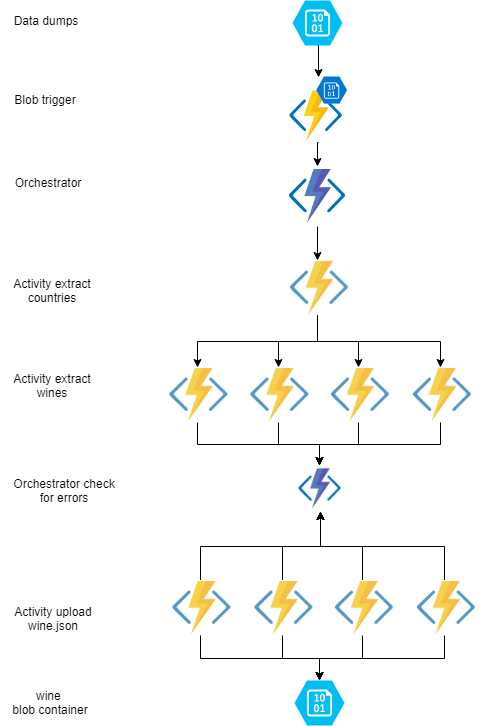
Ik maak in de POC gebruik ik een extract countries activity om de landen uit de XML te halen. Hierna ga met het fan out principe ik per land een activity starten om de wijnen per land uit structuur te halen. Als dit allemaal klaar is wordt er per wijn een activity gestart welke de wijn in JSON formaat upload in een blob container.
Zie hier een overzicht van de durable function:
Waar ben ik tegenaan gelopen tijdens de POC
Op papier leek dit de meest perfecte oplossing ik kon de landen in een activity uit de dump halen en dan per land een activity starten om de wijnen op te halen. Dit geeft je een goede schaalbaarheid, als er meer landen in komen worden er meer extract wine activitiy taken aangemaakt. Als er meer wijnen per land komen worden er meerdere upload activity taken aangemaakt.
Per bestand gaat de blob trigger af op de functie. De blob triggers welke niet meteen afgehandeld kunnen worden worden in een queue opgeslagen in het storage account van de function. Deze queue heeft een naam welke begint met azure-webjobs-blobtrigger-
Als het bestand binnenkomt wordt er een orchestrator opgestart welke de blobnaam doorgeeft aan de orchestrator.
var wineCountries = await context.CallActivityAsync<Countries[]>("A_ExtractWineCountries", fileName);
var tasks = new List<Task<Wine[]>>(); foreach (Countries wineCountry in wineCountries) { tasks.Add(context.CallActivityAsync<Wine[]>("A_ExtractWines", wineCountry)); }
var wineTasks = await Task.WhenAll(tasks); }
Als alle wijn data is opgehaald worden deze parallel geupload in de A_UploadWine activity.
var wineCountries = await context.CallActivityAsync<Countries[]>("A_ExtractWineCountries", fileName);
var tasks = new List<Task<Wine[]>>(); foreach (Countries wineCountry in wineCountries) { tasks.Add(context.CallActivityAsync<Wine[]>("A_ExtractWines", wineCountry)); }
var wineTasks = await Task.WhenAll(tasks);
List<Task> uploadWineTasks = new List<Task>(); foreach (Wine wineTask in wineTasks.SelectMany(x => x)) { uploadWineTasks.Add(context.CallActivityAsync("A_UploadWine", wineTask)); }
await Task.WhenAll(uploadWineTasks);
if (!context.IsReplaying) { log.LogDebug($"Finished file: {fileName}"); } }
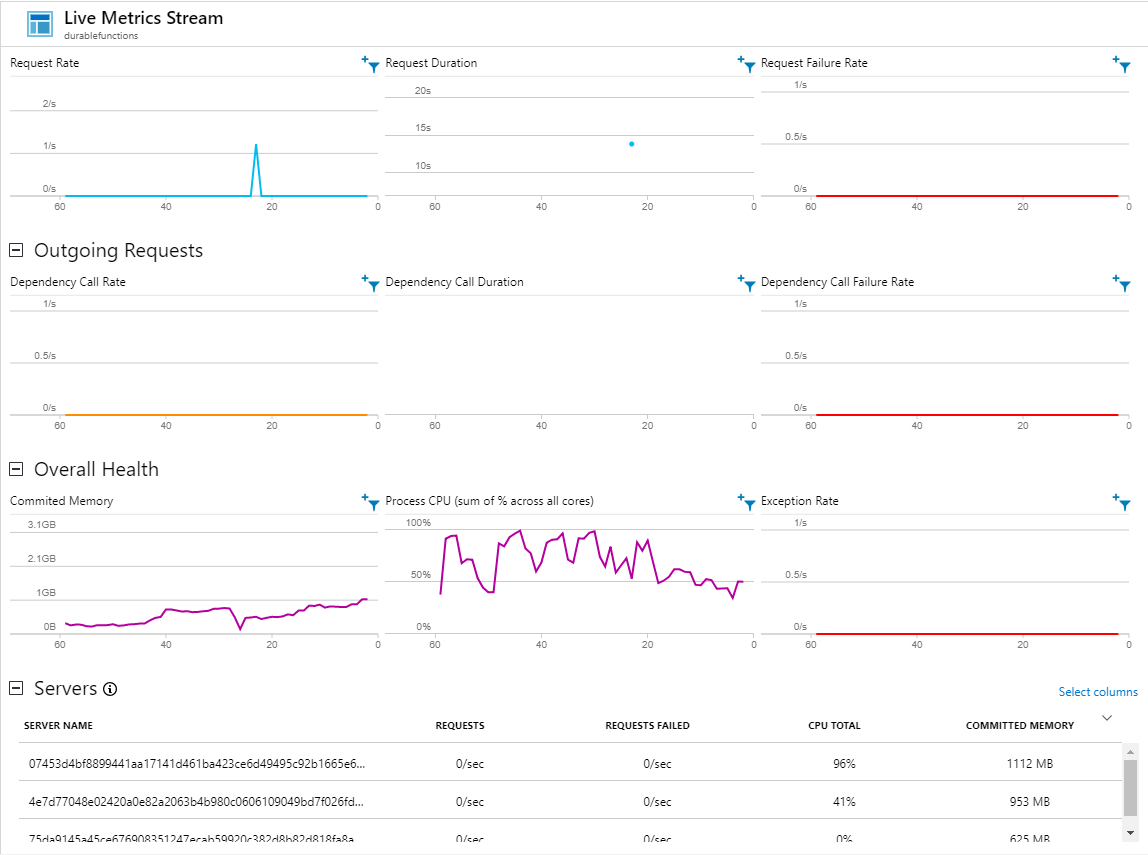
Tot zover ziet het er goed en schaalbaar uit tot ik het publiceerde naar een Azure function app. Ik kopieer met azcopy 40 bestanden van 75 mb in de blob container wine en start application insights op om te zien hoe de applicatie zich gedraagt.
Het resultaat wat ik te zien kreeg maakte me alles behalve blij. De applicatie liep niet soepel en stopte soms geheel met het verwerken van bestanden. Na lang zoeken en fine tunen kwam ik erachter wat een grote oorzaak van het probleem was.
Een Azure function app op een consumption plan heeft een geheugen limiet van 1,5 gigabyte en 1 processor core. Standaard draait Azure durable functions 10X het aantal activities als de host proecessor cores heeft (bij een consumption plan is dit dus 10 activities) en als er toevallig meerdere activities A_ExtractWineCountries worden gestart worden er meerdere XML bestanden in het geheugen geladen a 75 mb. Reken hierbij nog de orchestrator bij en het overige geheugen verbruik van een function app en je zit al snel aan 1,5 gig geheugen.
Zie het geheugen verbruik van 1 server zit al op 1112MB deze server.
Als je de geheugen limiet hebt bereikt wordt de server gestopt en worden de taken welke op de function app draaide niet afgemaakt deze worden deze opnieuw gestart op een andere function app.
Je kan instellen hoeveel activities en orchestrators er op een function app gestart mogen worden. Dit kun je doen in de host.config (https://docs.microsoft.com/en-us/azure/azure-functions/durable/durable-functions-bindings#hostjson-settings). Je kan de waardes aanpassen naar een lagere waarde alleen loopt het proces niet lekker stabiel door. Doordat het niet lekker stabiel doorloopt en dit als gevolg heeft dat de cpu belasting op en neer gaat gaat het automatisch schalen niet soepel.
Maak een functions app aan in Azure en configureer de connectionstring in de appsettings
Maak in de blob storage een 3 tal blob containers aan genaamd:
source
wines
wine
Publiseer het project naar de functions app.
Maak van het bestand DurableFunctionDemo/winedata.xml 40 kopieën en upload deze naar de wine folder in Azure storage
Start applications insight en kijk hoe de applicatie zich gedraagt.
Conclusie
Durable functions op een consumption plan is een hele mooie oplossing maar niet voor een applicatie welke intensief geheugen gebruikt en snel veel bestanden moet verwerken. Je blijft met het geheugen limiet van 1,5 gigabyte en je hebt geen invloed op welke activities er op een functions app worden gehost.
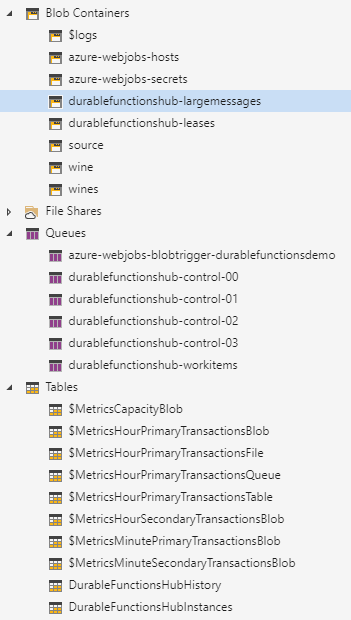
Er zit best wel wat overhead in het proces hij gebruikt namelijk je Azure storage account als queue voor communicatie tussen de orchestrator en de activities. Als je bericht groter is dan in de queue pas plaatst hij het in een blob container. Bijvoorbeeld als de berichten welke naar de activity A_UploadWine gaan groter zijn als 64KB (https://docs.microsoft.com/nl-nl/azure/service-bus-messaging/service-bus-azure-and-service-bus-queues-compared-contrasted#capacity-and-quotas) dan zullen deze in een blob container durablefunctionshub-largemessages worden opgeslagen om vervolgens op gehaald te worden in de activity A_UploadWine en deze activity upload hem dan naar de uiteindelijke blob container. Hier zitten al 2 blob storage acties in welke ook tijd en resources kosten.
Deze POC heeft het doel niet behaald wat we voor ogen hadden en we zullen opzoek gaan naar een andere oplossing. Het idee is om de taken te verdelen over meerdere Azure function apps. Zodra die POC is uitgewerkt zal ik de bevindingen delen in een nieuwe blog.


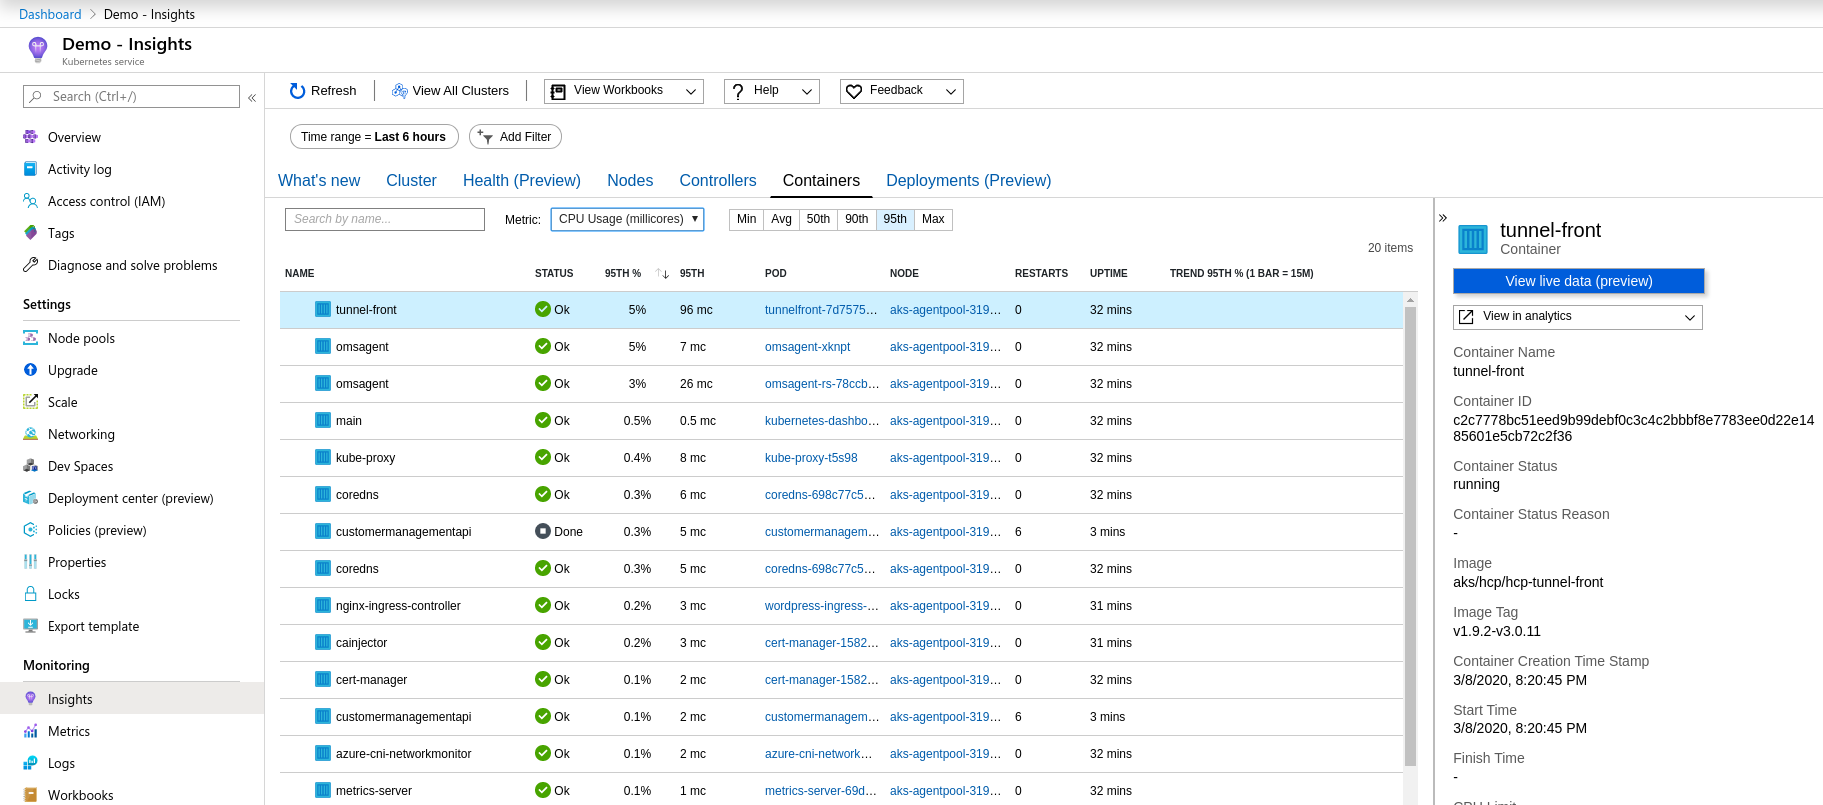 Een overzicht van de monitoring in AKS.